Akkoma setup guide
Note: This guide is currently a work in progress. These instructions may not be complete, and are subject to change.
Welcome to this guide for putting together a Website League node! Hosting a webserver on the public Internet can be a bit daunting, but hopefully this guide will help guide you through what's necessary to do so. There may be parts of the guide which are hard to understand, but try to take it slow, and if you need help, there's folks on the Discord who are willing to give assistance (the author of this guide included.) It's in this guide's author's opinion that everyone deserves to be able to have their own slice of the Internet, and knowledge should not be a barrier to that.
There's a few parts to setting up any webserver that uses ActivityPub - you have to obtain a domain name and a server, link the domain to the server, and then set up and configure your server to run your software of choice.
[temp chapter]
Planning a Node
Decisions
The two big things you can't change about your node once you've started it is your domain name, and your software. There are currently no known migration options for migrating from one federating software to another, and ActivityPub is extremely reliant on the domain name.
It’s effectively impossible to change either without effectively starting over with your instance, and re-using the same domain can have complications (although, you could use a (different) subdomain without problems.) You will want to make sure you are comfortable moving forward with the two things you choose in this regard.
Domain Name
As far as domain name goes, you’ll need to purchase it from a domain registrar - there are several options available to you in this regard. Choose one that's trustworthy, and one that you feel would have your back in the event of a security issue (i.e. your account gets hijacked.) The author of this document uses Porkbun, but there are other options out there; a few that have been mentioned are Namecheap, Glauca, and Cloudflare.
Keep in mind that name registrars will often offer a deeply discounted price for their domain names, and a much steeper price for subsequent years. Assuming you will be running this node for at least over a year, be mindful of what the normal renewal price will be, so you don't get stuck with a $40 renewal for what you thought was a $2 domain!
Once you've picked out your registrar of choice, go looking for a domain name! Keep in mind this domain will be at the end of your (and your users, if this is a multi-user node) username, so pick something that's both available and that you'd like at the end of your username! (For example, if you chose the domain sickos.social and your username was critter, your full username would be @critter@sickos.social.) You don't have to necessarily be elegant with this, but it can be fun coming up with a good domain!
Once you've come up with (and purchased) a good domain name for your instance, it's time to think about the software you'll use.
Fediverse Software
As far as software goes, you have a few options. The two known/adapted to work for the Website League as of writing this are GoToSocial and Akkoma. This guide will focus on installing Akkoma, but you may want to compare and contrast both to see which one you would prefer to run.
There are other federating software choices out there - such as Sharkey or the well-known Mastodon, but these are not included here as they either lack features or have flaws which disqualify them for use with the Website League. You may be able to patch the software to make it work, but this is out of the scope of this guide.
Server
Now that you've picked what software you'd like to use, and the domain name you'd like, the last thing you need to choose is where to put your instance! There are, again, multiple options for this - Vultr, Hivelocity, Linode, DigitalOcean, and OVH are options. (Oracle is also an option, and you may be able to get it for free, with the caveat that it's Oracle. However, Oracle and Hetzner, two major hosting options, disallow adult content on their servers, which mostly takes them out of the running for use on a social network that permits adult content.) For this guide, we will be using Hivelocity.
Note the $4.20 "Starter" VM from OVH may be sufficient, as it touts 2 GB of RAM - however, the author of this guide has had negative experiences with OVH in the past, and tends to avoid using them as a result.
For this guide, you're going to be getting their $7 VM - that is, 2 vCPUs and 4 GB of memory. For your operating system, choose Ubuntu 24.04. Hit Add to Cart and then checkout.
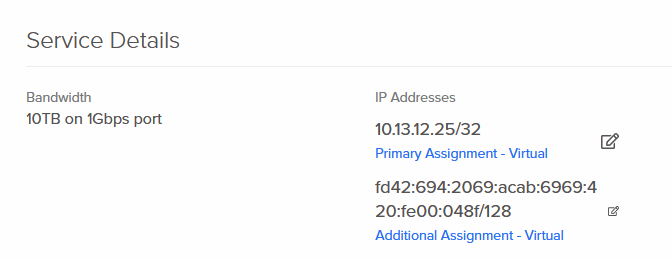
Once you've finished and logged in, you should be brought to your device list. You're now the proud owner of a virtual machine! Click on the one you just purchased, then "View All" under IP Assignments. Under "Service Details", take note of the IP addresses it's given you as we move on to the next section - configuring your domain name!
Setting Up your Domain Name
This page assumes you have, at a minimum, the following:
- A domain name you wish to use
- A VPS and its corresponding IP address as well as IPv6 address
If you don't have either, consider checking out the previous page, Planning a Node, then come back here once you have those.
It's now time to configure your domain name so that it links to your VPS, which will eventually hold your Website League node. For this guide, we will be using Porkbun, but whatever domain registrar you're using likely has its own interface for doing this.
Be careful if you're using Cloudflare to manage your domain - Cloudflare has been known before to cause federation issues by blocking server requests from time to time. You'll likely need to set up exceptions so it doesn't block federated traffic.
To link your domain to your VPS, you will create two records for the domain - an A record and an AAAA record. Computers don't inherently understand what a domain means, but they use records like this to translate domain names into IP addresses - which they do understand.
This complete guide will only cover setting up an instance on the same domain you will actually be hosting it from. It is possible to make where you host the instance differ from the instance name (the bit that goes at the end of your username), but this is a more advanced topic that can cause federation issues if done improperly. We will not be covering this in this guide.
Fill in the records with the following, replacing "awesome.instance" with your instance's domain:
| Record Type |
Host |
Answer |
| A |
awesome.instance | Your VPS's IP address |
| AAAA |
awesome.instance |
Your VPS's IPv6 address |
| CNAME |
media.awesome.instance |
awesome.instance |
As you may be able to guess, a CNAME record basically points to another DNS record. We'll need the media subdomain as part of setting up Akkoma, but they're going to both be on the same server, so it makes sense to just have both refer to the same records.
You can set the TTL to whatever you'd like. I like to set it to 300 to start for quick updates, then increase it down the line when it's less likely to change. Below is an example of what an A record might look like on Porkbun, if your IP address was 10.13.12.25 and your desired domain was tingus.raccoons.today:
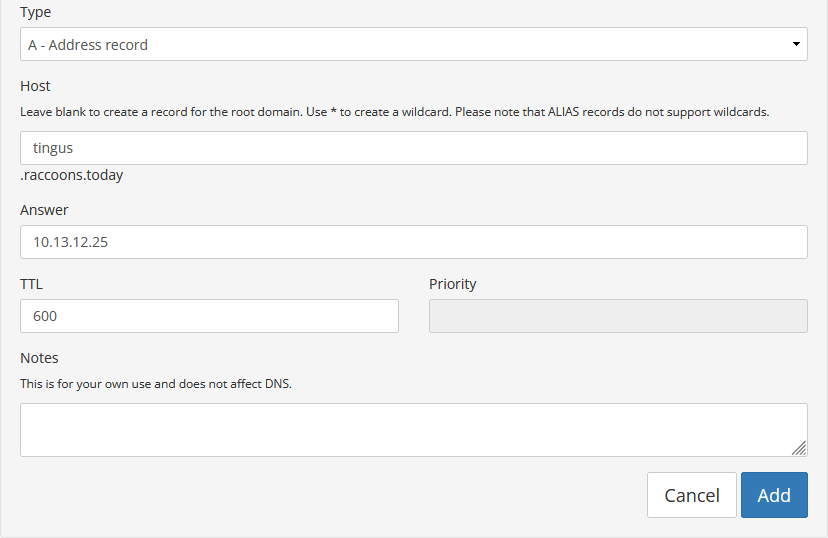
Note: On Porkbun, if I wished to just host it on raccoons.today with no subdomain, I would just leave that box blank. This may be different depending on how your registrar is set up. Feel free to ask in the Discord if you're uncertain!
Once you're done with that, it's time to start setting up the server!
Preparing Your VPS
This page makes the following assumptions:
- You have a running VPS.
- You have a domain name that's pointed to your VPS.
If this is not the case, go through the first two pages, Planning a Node and Setting Up your Domain Name, then come back here.
Logging Into Your VPS
Your host should have given you a username and password - the user is likely root. If the user is not root, it's likely it has "sudo" permissions - meaning you can use it to become root once logged in (and you can disregard the "Creating a User Account" steps later in this guide.) You likely also have a console you can log in through on your host - and this is useful, especially if you goof something up and can't log in any other way - but it's more ideal to be able to log in through something called SSH. This basically gives you a command prompt directly into your server, and, among other things, it's likely much easier to copy-paste info to and from it.
Assuming you're running Windows, one program you can use for logging into SSH is called PuTTY. You'll want to download the MSI "Windows Installer" - likely 64-bit x86, or 32-bit x86 if your PC is really old. All the defaults should be fine. Once you start up PuTTY, you'll be presented with a window like this:
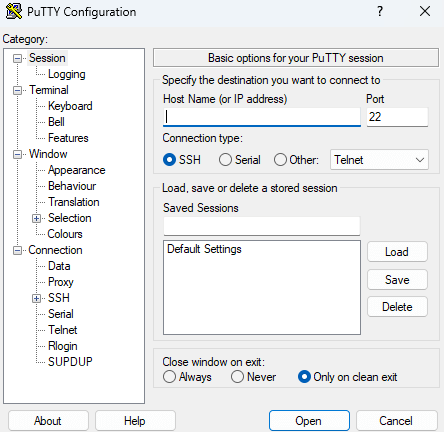
You'll put your VPS's IP address under "Host Name" and click Open, then press Accept. It'll then ask you for your username and password. Type in the details that your hosting provider gave you. Note that it won't show you typing any characters when entering your password - don't panic, that's by design. Once you do that, you should be in!
Before you continue, change the root password real quick by running this command:
passwdIt will ask you for a password. Type in whichever password you'd like, hit enter, and then type it in again. It should say "passwd: all authentication tokens updated successfully." If not, try again.
Let's also make sure nano is installed. This is a console text editor that's probably one of the friendlier options out there. (If you know you'd prefer vim/emacs, you can go ahead and use that instead!) Run this command:
apt install -y nanoIt should either install nano, or basically say "it's already the newest version, set to manually installed." Either way, you're good!
Securing Your VPS
At this point, you only have a root account with a password. While this technically works, this is not a good idea. The root account is one that has ultimate power over the server, and it's not one you typically want to be able to log directly into; instead, it's best to have a user account that you can then promote yourself to root through.
Creating a New User with Sudo Permissions
We're going to disable logging into the system as root over the internet. Instead, you're going to log in as a new user you're about to create, that can then be promoted to root using a command called "sudo". Run the following commands, replacing USERNAME_HERE with your desired username:
adduser USERNAME_HEREIt will guide you through setting up the user, giving them a password and the like. (Don't stress too much over filling out the user info like room number and work phone and whatnot.)
Next, run this command to add them to the wheel group, which is a special group that can be "promoted" to root using sudo:
usermod -aG sudo USERNAME_HEREThis works on Ubuntu 24.04, and likely other Debian-based operating systems. If this doesn't work, try replacing "sudo" with "wheel". If that doesn't work either, you can simply give your specific user sudo permissions by running the command EDITOR=nano visudo, then adding the following line:
USERNAME_HERE ALL=(ALL:ALL) ALLAt this point, try logging out and logging back in as your new user. Then, run the following command to promote yourself to sudo:
sudo su -It'll ask for your password - type it in. It should take you to a command prompt as root. If it says something along the lines of "This user is not in the sudoers file. This incident will be reported", then you'll need to log back in as root and check the sudoers file. If you need help with this, there are folks in the Discord!
If it did work, though, it's time to lock out remote root login.
Disabling Root Login
Before proceeding, make absolutely certain you can both log in as your new user and you can run sudo su - successfully. If you proceed, and you find you are unable to do either of these things, you will be locked out of SSH access to root altogether, and will need to use your webhost's console to re-enable root login.
Run the following command:
sudo nano /etc/ssh/sshd_configIn this file, look for a line that says "PermitRootLogin yes". You will want to change this line to instead say
PermitRootLogin noTo use Nano, you can move the text cursor with the arrow keys, and type as you normally would. When you're finished, press Ctrl+X. If you've made any changes, you'll be asked whether you want to save them or not - hit Y for Yes, N for No, then Enter to write the changes to the file you were writing (or change the name if you wish to write it to a new/different file.)
Save the file, and then restart SSH:
sudo systemctl restart sshFrom now on, you will only log into your server with the username and password you gave it. Trying to log in with the root credentials over SSH will not work. They will still work when logging in via your webhost's console, however, so keep your root password somewhere safe just in case you need it.
While not included here, you may also want to consider setting up login using a private key. This is more secure than a password. Steps to do this will be included at a later date, but it should be something you can find online or ask for help with.
Setting Up a Firewall
We're now going to set up the firewall so it allows you to log in to SSH and allows it to act as a webserver, but doesn't allow anyone else to connect to it otherwise.
These instructions should work on Ubuntu 24.04 and likely other Debian-based distros.
First, make sure ufw is installed and its service is running:
sudo apt install -y ufw
sudo apt enable --now ufw
Now, let's start adding rules for SSH, HTTP, and HTTPS:
sudo ufw allow ssh
sudo ufw allow http
sudo ufw allow https
After each command, it should say "Rules updated" and "Rules updated (v6)".
Then, enable the firewall:
sudo ufw enableIt will warn you it may disrupt existing ssh connections. As long as you added a rule to allow ssh connections, you shouldn't be disconnected.
In the event you are, for some reason, disconnected, don't panic - you can always connect to the server via your webhost's console.
Once enabled, you can see by running the following command that you are, indeed, allowing traffic on ports 22, 80, and 443:
sudo ufw status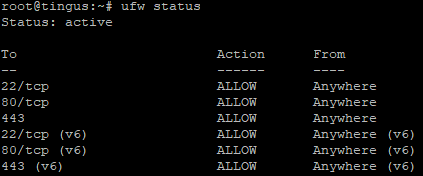
We don't cover setting up a firewall with the webhost, as this is unfortunately not something Hivelocity offers. If you chose a different webhost that does offer a firewall, the GoToSocial version of this page has a section on configuring a webhost firewall: Preparing Your VPS
Update
Now that we've got those bits out of the way, let's make sure your OS is up to date. Run the following command:
sudo apt update
sudo apt upgrade -y
It should automatically download and update all your OS packages. If there were any updates, you may want to restart afterwards, just to make sure they're in effect:
sudo shutdown -r nowRelatively easy!
These are only a few of the things you can do to increase the security of your system - this is only scratching the surface. You can write an entire book with all the ways you can further secure a system - such as installing and configuring something like fail2ban to monitor failed logins, auditing applications to monitor operating system changes, tweaking kernel settings - although, each security improvement also comes with its own caveats and associated difficulties. Consider what makes sense for your system and your risk level.
Once you've got all that out of the way, it's time for the moment we've all been waiting for - installing Akkoma!
Installing Akkoma
This install can get a little messy, and this guide should still be considered in a "beta" state. There have been some confusion from people testing this on their system. Take it slow and carefully, and ask for help if you need it.
This page makes the following assumptions:
- You have a running VPS, prepared according to the instructions in Preparing Your VPS.
- You have a domain name that's pointed to your VPS.
If either of these aren't true, please read through the last three pages.
We're now going to download, install, and configure Akkoma, as well as some dependencies and a few other services we'll need to make this work: specifically, Caddy and PostgreSQL.
PostgreSQL is used to store information, such as account details, user posts, and the like. Caddy is something called a "reverse proxy" - think of it like opening a portal from the outside world into a specific application within your VPS. Caddy also does some other heavy lifting for us, such as getting SSL certificates (which allow folks and other servers to securely connect to your instance).
We are doing this install from source. Installing from OTP as broken, as a necessary dependency has been removed from Ubuntu 24.04. This guide is based off of, and uses much of the same commands as, the upstream documentation: Installing on Debian Based Distributions
Installing Dependencies
We have a few things we need to install - namely, PostgreSQL, Caddy, and a handful of dependencies - some required to build and run Akkoma, and a few required to enable useful features:
sudo apt install git build-essential postgresql postgresql-contrib cmake libmagic-dev elixir erlang-dev erlang-nox imagemagick ffmpeg libimage-exiftool-perl caddyBefore we continue, let's create the Akkoma system user - we'll need it eventually, but we may need it very soon:
sudo useradd -r -s /bin/false -m -d /var/lib/akkoma -U akkomaRun the following command, and ensure you have at least OTP 25 and Elixir 1.14:
elixir --versionIf you at least meet those versions, skip directly to Tuning Postgres. If not, uninstall Elixir and Erlang, then proceed with the next section, Installing asdf:
sudo apt remove elixir erlang-dev erlang-nox
sudo apt autoremove
Installing Elixir and Erlang with asdf
asdf is an application that effectively manages versions of different applications available to a given project. We will be using it to install a recent version of Erlang and Elixir.
You're first going to need a few more dependencies:
sudo apt install -y curl unzip build-essential autoconf m4 libncurses5-dev libssh-dev unixodbc-dev xsltproc libxml2-utils libncurses-devNext, let's change to the akkoma user, then download asdf.
sudo su -l akkoma -s $SHELL
git clone https://github.com/asdf-vm/asdf.git /var/lib/akkoma/.asdf --branch v0.11.3
From now until Tuning Postgres, you will run all of these commands as the akkoma user.
Next, we'll add a few lines to the end of .bashrc, and then restart your akkoma shell.
cat <<EOT >> ~/.bashrc
. "$HOME/.asdf/asdf.sh"
# asdf completions
. "$HOME/.asdf/completions/asdf.bash"
EOT
exec $SHELL
Let's start compiling and installing Erlang, and then installing Elixir. Compiling Erlang will take a few moments!
asdf plugin add erlang https://github.com/asdf-vm/asdf-erlang.git
export KERL_CONFIGURE_OPTIONS="--disable-debug --without-javac"
asdf install erlang 25.3.2.5
asdf global erlang 25.3.2.5
asdf plugin-add elixir https://github.com/asdf-vm/asdf-elixir.git
asdf install elixir 1.15.4-otp-25
asdf global elixir 1.15.4-otp-25Finally, check the elixir version once again, to make sure you now have the right version:
elixir --versionIf it is indeed correct, go ahead and exit your akkoma shell back into root.
exitTuning Postgres
We're going to take a slight detour from the install documentation to tune PostgreSQL a little bit. This will help tweak the performance to work better with our kind of setup - including the fact we are on an SSD and can use SSD speeds.
The following tune was created using PGTune, and was created assuming a VPS with 4 GB of memory and 2 CPU cores (and I told the tune to only use 3 GB of memory.) If your specs are different, you may want to create your own tune. If you create your own tune, I also selected "Web Application" for database type, 100 max connections, and SSD storage.
Open postgresql.conf in nano:
sudo nano /etc/postgresql/16/main/postgresql.confFind the following settings in the file, and change them to read the following (including un-commenting them if they're commented out):
max_connections = 20
shared_buffers = 768MB
effective_cache_size = 2304MB
maintenance_work_mem = 192MB
checkpoint_completion_target = 0.9
wal_buffers = 16MB
default_statistics_target = 100
random_page_cost = 1.1
effective_io_concurrency = 200
work_mem = 19660kB
huge_pages = off
min_wal_size = 1GB
max_wal_size = 4GB
You can press Ctrl+W in Nano to run a search.
Then, enable and restart postgresql:
sudo systemctl enable postgresql
sudo systemctl restart postgresql
Installing and Configuring Akkoma
Make the directory Akkoma's gonna live in, then clone the stable version of the Website League fork:
sudo mkdir -p /opt/akkoma
sudo chown -R akkoma:akkoma /opt/akkoma
sudo -Hu akkoma git clone https://gitlab.com/website-league/akkoma/akkoma.git -b wl-stable /opt/akkoma
Switch to a shell as the Akkoma user, go into the Akkoma directory, and install dependencies.
sudo su -l akkoma -s $SHELL
cd /opt/akkoma
MIX_ENV=prod mix deps.get
If it asks you to install Hex, answer Yes.
From now until further notice, you will be running these commands as the akkoma user. If you didn't need to use asdf, you may be able to run these using sudo -Hu akkoma instead. (The author of this guide ran into problems trying to use sudo with asdf.)
For any mix command you run, you will want to add MIX_ENV=prod before the beginning of it. This tells Akkoma to use the production configuration and not the development configuration. If you don't add this, it may use the wrong configuration, which can cause a lot of confusion!
Run this command to begin configuring your instance (after it compiles a bunch of dependencies):
MIX_ENV=prod mix pleroma.instance genIf it asks you to install rebar3, say yes.
Use the domain you set the A and AAAA records earlier for as your instance domain.
Use the domain you set the CNAME record earlier for as part of your media base URL:
https://media.awesome.instance/mediaUse the defaults for anything database related (hostname, username, database name, password) - the configuration guide will effectively generate a script to create that database, user, and password on Postgres for you.
When asked about if you want to store your config in the database, say yes.
You can answer no to this - there are folks who prefer modifying their setup from only the config file (as the config would be one source of truth) - but this does come with major inconveniences (such as Akkoma recompiling with every config change.) You can change your mind on this down the line if you need to.
Once done, it will create a few config files for you, as well as a robots.txt and a postgres setup script.
Rename the generated config so Akkoma will use it, then temporarily leave the Akkoma shell so you can then set up the database:
exit
sudo -Hu akkoma mv /opt/akkoma/config/{generated_config.exs,prod.secret.exs}
sudo -Hu postgres psql -f /opt/akkoma/config/setup_db.psql
sudo su -l akkoma -s $SHELL
cd /opt/akkoma/
Once back in the akkoma shell, in the /opt/akkoma/ directory, run database migrations real quick.
MIX_ENV=prod mix ecto.migrateOne more thing - we're going to make a quick edit to our generated config file:
nano config/prod.secret.exsSince we're using a version of Postgres later than 12, we can tell Akkoma to run more efficient queries by adding this bit of config under config :pleroma, Pleroma.Repo:
config :pleroma, Pleroma.Repo,
  prepare: :named,
  parameters: [
    plan_cache_mode: "force_custom_plan"
  ],
  <rest of the Pleroma.Repo config here>
Save, then exit the Akkoma user console again.
exitWe're getting close to finishing! Now we just need to set up the reverse proxy, Caddy, as well as the service for Akkoma!
Configuring Caddy
Assuming this is a brand new instance with an unconfigured install of Caddy, replace the current Caddy config file with the one from Akkoma, then open it up in an editor:
  sudo rm /etc/caddy/Caddyfile
  sudo cp /opt/akkoma/installation/caddy/Caddyfile /etc/caddy/Caddyfile
  sudo nano /etc/caddy/Caddyfile
Replace example.tld with your instance domain. Then, uncomment every line starting from media.example.tld, and replace media.example.tld with your media instance domain (the one you set the CNAME for.) Then add the following three lines to the top of the first section in curly braces:
  # block freespeechextremists
  @blocked header_regexp User-Agent FediList*
  abort @blocked
The start of your Caddyfile should look something like this:
your.cool.instance {
  # block freespeechextremists
  @blocked header_regexp User-Agent FediList*
  abort @blocked

  log {
      output file /var/log/caddy/akkoma.log
  }

  (...rest of the file here...)
Enable and restart Caddy.
sudo systemctl enable caddy
sudo systemctl restart caddy
Test that blocking the freespeechextremists crawler worked by replacing example.tld with your domain instance.
curl -A "FediList Agent/2 (https://fedilist.com/)" https://example.tldThe result should be:
curl: (92) HTTP/2 stream 1 was not closed cleanly: INTERNAL_ERROR (err 2)Configuring and Starting the Akkoma Service
Copy the systemd service file over from Akkoma's install directory, then open it with a text editor.
sudo cp /opt/akkoma/installation/akkoma.service /etc/systemd/system/akkoma.service
sudo nano /etc/systemd/system/akkoma.service
If you used asdf to install Elixir and Erlang earlier, follow the comments throughout the service file:
; Uncomment if using asdf to manage Elixir and Erlang
Environment="PATH=/var/lib/akkoma/.asdf/shims:/var/lib/akkoma/.asdf/bin:/usr/local/sbin:/usr/local/bin:/usr/sbin:/usr/bin:/sbin:/bin"

(...no changes to the config until a bit later in the file...)

; ExecStart=/usr/bin/mix phx.server
; If using asdf comment the above line and uncomment the one below instead
ExecStart=/var/lib/akkoma/.asdf/shims/mix phx.server
Double-check everything in the service file looks correct. Once you're sure, save and exit.
Reload systemctl config (just in case), then... it's time to enable and start your Akkoma instance:
sudo systemctl daemon-reload
sudo systemctl enable --now akkoma.service
Make sure it doesn't crash - you can also check its progress with the command:
sudo journalctl -feu akkomaYou might get an error about tzdata - this should be OK. You should see something like the following in the logs at some point:
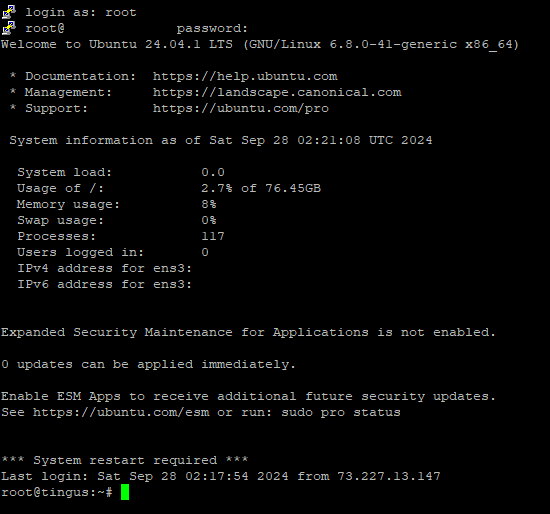
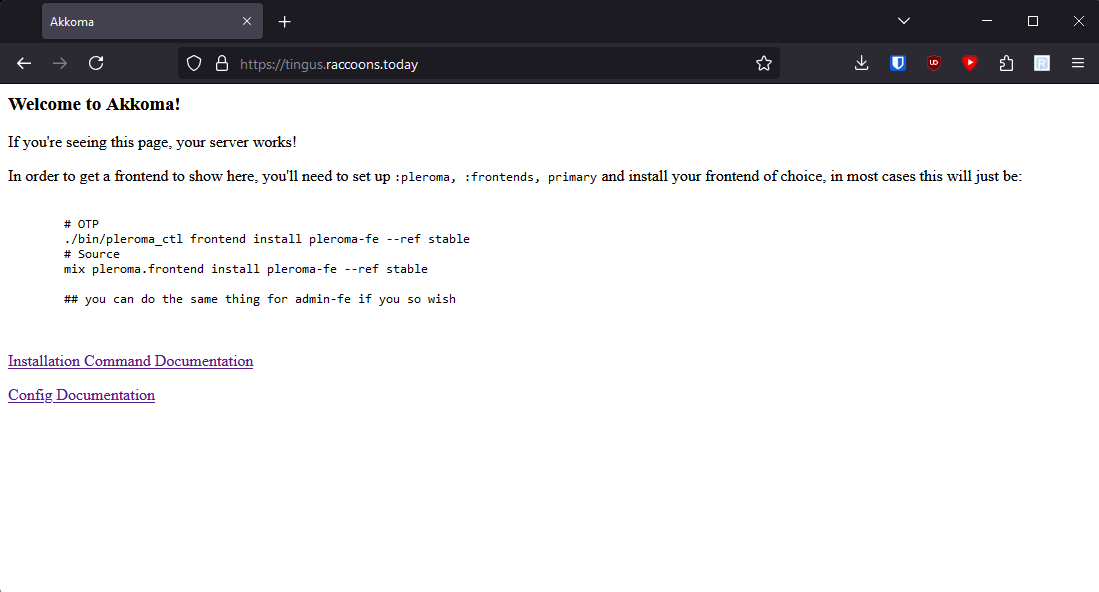
Sep 28 05:02:57 tingus.raccoons.today mix[36029]: 05:02:57.931 [info] Running Pleroma.Web.Endpoint with cowboy 2.12.0 at 127.0.0.1:4000 (http)
Sep 28 05:02:57 tingus.raccoons.today mix[36029]: 05:02:57.932 [info] Access Pleroma.Web.Endpoint at https://tingus.raccoons.today
If you get there, try browsing to your instance and see what happens!
...Ah, right, we need to install a frontend. And create your user account, that too.
Create a User and Install a Frontend
We'll need to log back into the Akkoma user again and go back to the install directory:
sudo su -l akkoma -s $SHELL
cd /opt/akkoma/
If you changed your config earlier to require E-mail confirmation, you'll likely want to disable that now, before creating your account, just in case it's not working - it doesn't appear like you can confirm E-mails via the console.
Then, run this command to create a user, replacing <username> with your desired username and <your@emailaddress> with your E-mail address:
MIX_ENV=prod mix pleroma.user new <username> <your@emailaddress> --adminIt'll give you a reset password URL - go to that page in your browser to set your password.
and just run these commands to install the Website League fork of the main frontend, as well as the admin frontend (if you enabled database configuration):
MIX_ENV=prod mix pleroma.frontend install pleroma-fe --ref stable --build-url https://git.tenna.zip/Tenna/akkoma-fe/releases/download/10102024-2/akkoma-fe.zip
MIX_ENV=prod mix pleroma.frontend install admin-fe --ref stable
Now try browsing to your instance!
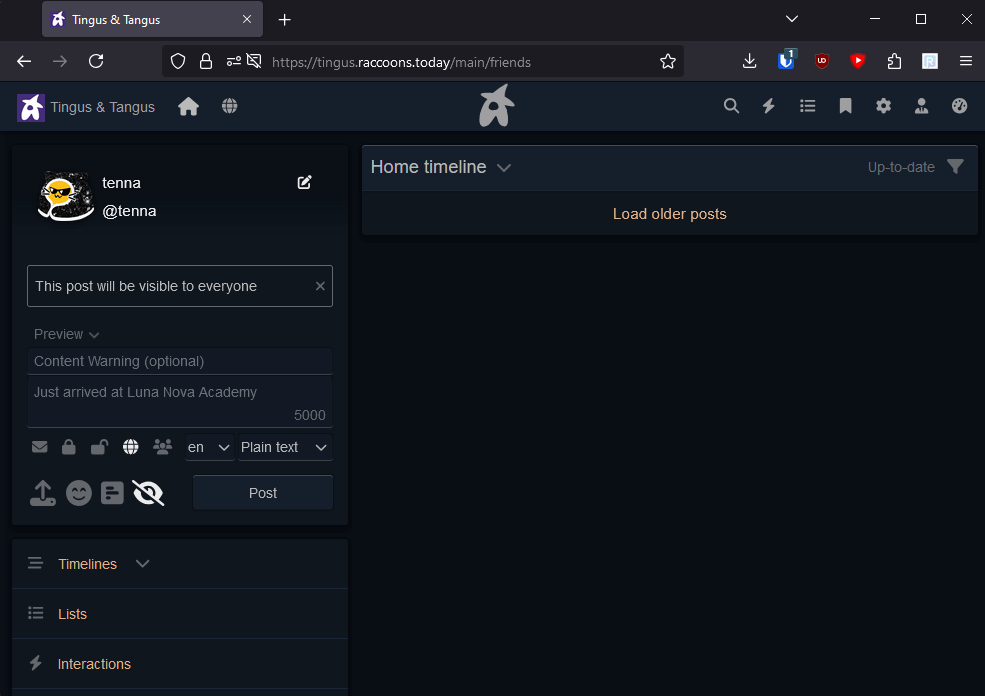
Now that's more like it! Also, make sure you can upload images as well, just to make sure your media domain is working properly.
...And we should probably make a few config changes real quick, since right now your instance is technically running on open, blocklist federation. We don't want that.
Switching to Allowlist Federation, Adding Domains, and Other Config
As of the time of writing this guide, there is not an automated procedure to add domains to the allowlist. One will be made in the future - in the interim, this guide will include steps on how to configure it and add domains manually.
Note that, even after adding all the domains to the allowlist, if you just started your instance (and haven't pre-emptively had your instance added to the Website League node list), it's likely other instances haven't added your domain to their allowlist yet, and so looking up their information will fail until they update their allowlists.
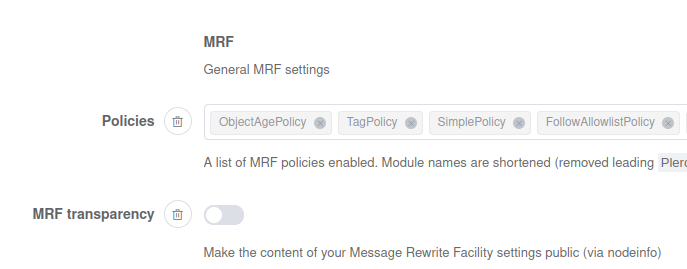
Click on the little speedometer icon on the top right of the screen, or go to https://<your-instance-domain>/pleroma/admin/.
Once in the admin control panel, go to Settings, then MRF. Under Policies, add "SimplePolicy" and "FollowAllowlistPolicy", and then disable MRF transparency:
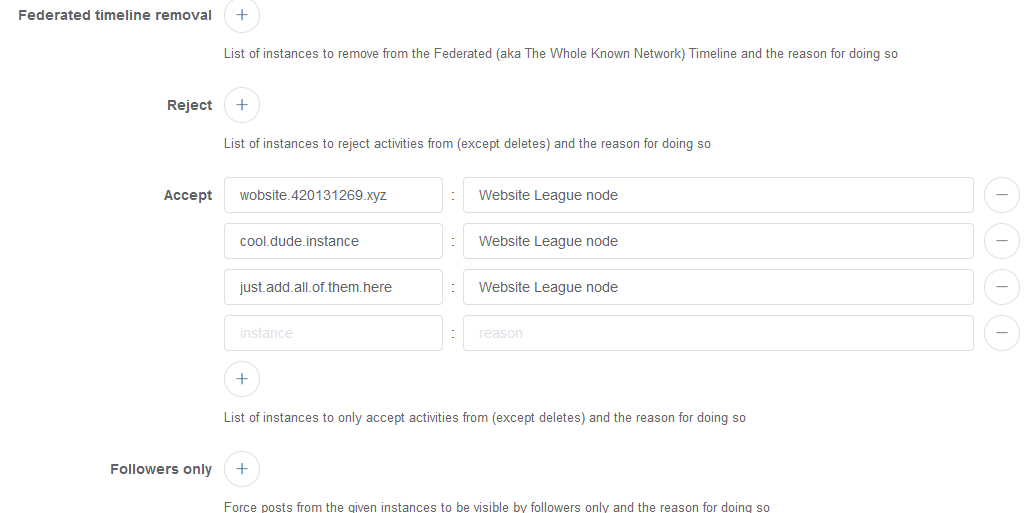
Then, scroll down to the MRF Simple section, then under Accept, add each Website League domain, and put whatever you'd like under Reason (for your records):
Also scroll down to the MRF Follow Allowlist section and set the values as follows:
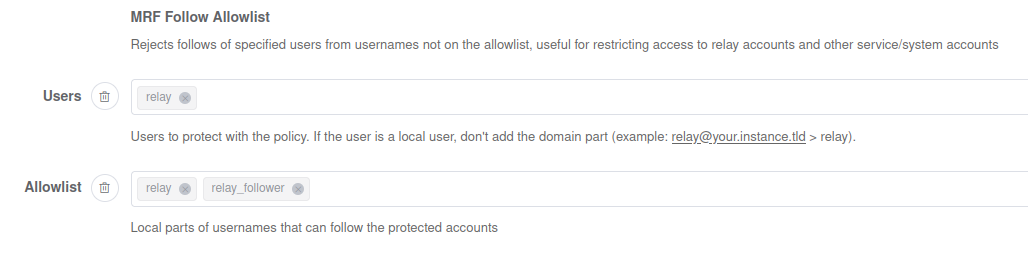
Hit Submit, and you're good to go - by adding domains to the Accept list, your instance has automatically switched to allowlist federation, and the follow allowlist will restrict access to the relay account we're about to enable (we don't want normal users to be able to follow it because the relay accounts can be used to approximate a federated timeline).
Additionally, change the following settings:
Other Config to Set
Take a look through all the settings - there's a few things you may want to change or tweak:
- ActivityPub > Outgoing Blocks: Enable
- This should be fine to enable in the Website League, as nodes are vetted and nobody should be installing anything that would abuse this to notify users if they have been blocked.
- Anything in Frontend
- It's your node - feel free to customize it!
- Anything in Instance
- Change the description, bump up the limit to something nice (50k seems fine)
- Specific items in Instance:
- Registrations Open: Disable this if you're invite only or a single user node.
- Account approval required: You must enable this if your registrations are open.
- Invites Enabled: Enable if you want to enable invites.
- Account activation required: Enable this if you want folks to validate their E-mails and you can confirm Akkoma successfully sends E-mails.
- Public: Disable if you wish to limit access from unauthenticated folks seeing stuff from your instance.
- Anything in Mailer if you want to send E-mails
- Other > Terms of Service
- Put together a terms of service for your node specifically if you'd like!
Make sure to save your settings once you're done changing them!
You can change the favicon by placing favicon.png in /opt/akkoma/instance/static
Manual Config Changes
If you're not using the database config, below is the equivalent changes as to what were applied above that are necessary (still refer to the documentation for more):
config :pleroma, :mrf,
  policies: [
    Pleroma.Web.ActivityPub.MRF.ObjectAgePolicy,
    Pleroma.Web.ActivityPub.MRF.TagPolicy,
    Pleroma.Web.ActivityPub.MRF.SimplePolicy
  ],
  transparency: false

config :pleroma, :mrf_simple,
  accept: [
    {"website-league-node.here", "Website League node"},
    {"another-website-league-node.here", "Website League node"},
    {"yet-another-node.here", "Website League node"},
    # just keep adding a line like the 3 above for each node you want to add
    {"secret-fourth.node", "Website League Node"}
    # and the last one has no comma at the end
  ]

config :pleroma, :activitypub, outgoing_blocks: true, authorized_fetch_mode: true

config :pleroma, :instance,
  federated_timeline_available: false

config :pleroma, :frontend_configurations,
  pleroma_fe: %{
    hidePostStats: true,
    hideUserStats: true,
    redirectRootNoLogin: "/about"
  }
Additionally, regardless of whether you use database config or not, add the following if you wish to disable the local timeline:
config :pleroma, :instance,
  local_timeline_available: false

config :pleroma, :frontend_configurations,
  pleroma_fe: %{ redirectRootNoLogin: "/about"  }
For all other changes, the upstream configuration is a good (albeit not entirely exhaustive) source to find what everything does: Configuration Cheatsheet
And with that, you should be done! If you're still here, thank you very much for following through, and congrats on your new instance! I hope this guide helped! If you have any problems or any questions, folks in the Discord should be able to help - the author of this guide included, Tenna Lotor. Best of luck to you, and welcome to the Website League!
Miscellenous Procedures
There are certain things you may want to do with your Akkoma install after the fact - for example, if you originally set up your instance to pull configuration from the config file, and you later wish to instead pull it from the database. This page is to guide you through such procedures.
Running Commands
Note that for any mix command you run, you will want to run it as the akkoma user, and you will want to add "MIX_ENV=prod" to the beginning.
If you don't tell it anything, it will assume that you want to affect a dev environment, including pulling all of the config for the dev environment. This is not what we want - largely because it will not use your config (anything in prod.secrets.exs). You will always want to add MIX_ENV=prod to the beginning of a mix command.
If you installed Elixir and Erlang with asdf, you will need to go into a shell as the Akkoma user, navigate to the install directory, and run the command that way:
sudo su -l akkoma -s $SHELL
cd /opt/akkoma
MIX_ENV=prod mix <the mix command here>
If you installed Elixir and Erlang through your distro, you still need to navigate to the install directory, but you can use sudo instead:
cd /opt/akkoma/
sudo -Hu akkoma MIX_ENV=prod mix your_command_here
For these procedures, we will go into a shell as the Akkoma user. This works for all config, regardless of if you used asdf or not.
Migrating from Text Config to Database Config
If you chose not to use database config during install and changed your mind, follow this procedure to migrate to using the in-database config instead.
Before you can do anything, you'll need to enable the setting to configure Akkoma from the database:
echo 'config :pleroma, configurable_from_database: true' >> /opt/akkoma/config/prod.secret.exs
systemctl restart akkoma
Wait for Akkoma to compile (you can watch with journalctl -feu akkoma), then enter the Akkoma user shell:
sudo su -l akkoma -s $SHELL
cd /opt/akkoma
and run this command to migrate your config to the database:
MIX_ENV=prod mix pleroma.config migrate_to_dbFinally, exit the Akkoma shell and restart.
exit
systemctl restart akkoma
Once Akkoma's back up, you should be able to edit your config in the Admin frontend now.
Migrating From Database Config to Text Config
If you chose to use database config during install and changed your mind, follow this procedure to migrate from using the in-database config back to text config instead.
Enter the Akkoma user shell:
sudo su -l akkoma -s $SHELL
cd /opt/akkoma
Then, you're going to run this command to pull all the config currently in the database and write it to a file:
MIX_ENV=prod mix pleroma.config migrate_from_dbIt should write what config you have in the database to a new config file - config/prod.exported_from_db.secret.exs. You will want to take all of the config from this file and merge it into what's in your prod.secret.exs.
Once you've completed that, remove the following line from your config:
config :pleroma, configurable_from_database: trueand then exit the shell and restart Akkoma.
exit
sudo systemctl restart akkoma