This install can get a little messy, and this guide should still be considered in a "beta" state. There have been some confusion from people testing this on their system. Take it slow and carefully, and ask for help if you need it.
This page makes the following assumptions: - You have a running VPS (Virtual Private Server), or some other server to run your software. - You have a domain name reserved for your node that's pointed to your VPS. If either of these aren't true, the [New Node Setup Guide](https://information.websiteleague.org/books/operators-handbook/chapter/new-node-setup-guide "New Node Setup Guide") can get you started! We're now going to download, install, and configure Akkoma, as well as some dependencies and a few other services we'll need to make this work: specifically, Caddy and PostgreSQL. PostgreSQL is used to store information, such as account details, user posts, and the like. Caddy is something called a "reverse proxy" - think of it like opening a portal from the outside world into a specific application within your VPS. Caddy also does some other heavy lifting for us, such as getting SSL certificates (which allow folks and other servers to securely connect to your instance).We are doing this install from source. Installing from OTP as broken, as a necessary dependency has been removed from Ubuntu 24.04. This guide is based off of, and uses much of the same commands as, the upstream documentation: [Installing on Debian Based Distributions](https://docs.akkoma.dev/stable/installation/debian_based_en/ "Installing on Debian Based Distributions")
#### Installing Dependencies We have a few things we need to install - namely, PostgreSQL, Caddy, and a handful of dependencies - some required to build and run Akkoma, and a few required to enable useful features: ```bash sudo apt install git build-essential postgresql postgresql-contrib cmake libmagic-dev elixir erlang-dev erlang-nox imagemagick ffmpeg libimage-exiftool-perl caddy ``` Before we continue, let's create the Akkoma system user - we'll need it eventually, but we may need it very soon: ```bash sudo useradd -r -s /bin/false -m -d /var/lib/akkoma -U akkoma ``` Run the following command, and ensure you have at least **OTP 25** and **Elixir 1.14:** ```bash elixir --version ``` If you at least meet those versions, skip directly to **Tuning Postgres**. If not, uninstall Elixir and Erlang, then proceed with the next section, **Installing asdf**: ```bash sudo apt remove elixir erlang-dev erlang-nox sudo apt autoremove ``` ##### Installing Elixir and Erlang with asdf asdf is an application that effectively manages versions of different applications available to a given project. We will be using it to install a recent version of Erlang and Elixir. You're first going to need a few more dependencies: ```bash sudo apt install -y curl unzip build-essential autoconf m4 libncurses5-dev libssh-dev unixodbc-dev xsltproc libxml2-utils libncurses-dev ``` Next, let's change to the akkoma user, then download asdf. ```bash sudo su -l akkoma -s $SHELL git clone https://github.com/asdf-vm/asdf.git /var/lib/akkoma/.asdf --branch v0.11.3 ```From now until **Tuning Postgres**, you will run all of these commands as the akkoma user.
Next, we'll add a few lines to the end of .bashrc, and then restart your akkoma shell. ```bash cat <The following tune was created using [PGTune](https://pgtune.leopard.in.ua/ "PGTune"), and was created assuming a VPS with 4 GB of memory and 2 CPU cores (and I told the tune to only use 3 GB of memory.) If your specs are different, you may want to create your own tune. If you create your own tune, I also selected "Web Application" for database type, 100 max connections, and SSD storage.
Open postgresql.conf in nano: ```bash sudo nano /etc/postgresql/16/main/postgresql.conf ``` Find the following settings in the file, and change them to read the following (including un-commenting them if they're commented out): ```bash max_connections = 20 shared_buffers = 768MB effective_cache_size = 2304MB maintenance_work_mem = 192MB checkpoint_completion_target = 0.9 wal_buffers = 16MB default_statistics_target = 100 random_page_cost = 1.1 effective_io_concurrency = 200 work_mem = 19660kB huge_pages = off min_wal_size = 1GB max_wal_size = 4GB ```You can press Ctrl+W in Nano to run a search.
Then, enable and restart postgresql: ```bash sudo systemctl enable postgresql sudo systemctl restart postgresql ``` #### Installing and Configuring Akkoma Make the directory Akkoma's gonna live in, then clone the stable version of the Website League fork: ```bash sudo mkdir -p /opt/akkoma sudo chown -R akkoma:akkoma /opt/akkoma sudo -Hu akkoma git clone https://gitlab.com/website-league/akkoma/akkoma.git -b wl-stable /opt/akkoma ``` Switch to a shell as the Akkoma user, go into the Akkoma directory, and install dependencies. ```bash sudo su -l akkoma -s $SHELL cd /opt/akkoma MIX_ENV=prod mix deps.get ``` If it asks you to install Hex, answer Yes.From now until further notice, you will be running these commands as the akkoma user. If you didn't need to use asdf, you may be able to run these using **sudo -Hu akkoma** instead. (The author of this guide ran into problems trying to use sudo with asdf.)
For any mix command you run, you will want to add **MIX\_ENV=prod** before the beginning of it. This tells Akkoma to use the production configuration and not the development configuration. If you don't add this, it may use the wrong configuration, which can cause a lot of confusion!
Run this command to begin configuring your instance (after it compiles a bunch of dependencies): ```bash MIX_ENV=prod mix pleroma.instance gen ``` If it asks you to install rebar3, say yes. Use the domain you set the A and AAAA records earlier for as your instance domain. Use the domain you set the CNAME record earlier for as part of your media base URL: ``` https://media.awesome.instance/media ``` Use the defaults for anything database related (hostname, username, database name, password) - the configuration guide will effectively generate a script to create that database, user, and password on Postgres for you. When asked about if you want to store your config in the database, say yes.You *can* answer no to this - there are folks who prefer modifying their setup from only the config file (as the config would be one source of truth) - but this does come with major inconveniences (such as Akkoma recompiling with every config change.) You can change your mind on this down the line if you need to.
Once done, it will create a few config files for you, as well as a robots.txt and a postgres setup script. Rename the generated config so Akkoma will use it, then temporarily leave the Akkoma shell so you can then set up the database: ```bash exit sudo -Hu akkoma mv /opt/akkoma/config/{generated_config.exs,prod.secret.exs} sudo -Hu postgres psql -f /opt/akkoma/config/setup_db.psql sudo su -l akkoma -s $SHELL cd /opt/akkoma/ ``` Once back in the akkoma shell, in the /opt/akkoma/ directory, run database migrations real quick. ```bash MIX_ENV=prod mix ecto.migrate ``` One more thing - we're going to make a quick edit to our generated config file: ```bash nano config/prod.secret.exs ``` Since we're using a version of Postgres later than 12, we can tell Akkoma to run more efficient queries by adding this bit of config under **config :pleroma, Pleroma.Repo**: ``` config :pleroma, Pleroma.Repo, prepare: :named, parameters: [ plan_cache_mode: "force_custom_plan" ],**If you used asdf to install Elixir and Erlang earlier**, follow the comments throughout the service file:
``` ; Uncomment if using asdf to manage Elixir and Erlang Environment="PATH=/var/lib/akkoma/.asdf/shims:/var/lib/akkoma/.asdf/bin:/usr/local/sbin:/usr/local/bin:/usr/sbin:/usr/bin:/sbin:/bin" (...no changes to the config until a bit later in the file...) ; ExecStart=/usr/bin/mix phx.server ; If using asdf comment the above line and uncomment the one below instead ExecStart=/var/lib/akkoma/.asdf/shims/mix phx.server ``` Double-check everything in the service file looks correct. Once you're sure, save and exit. Reload systemctl config (just in case), then... it's time to enable and start your Akkoma instance: ```bash sudo systemctl daemon-reload sudo systemctl enable --now akkoma.service ``` Make sure it doesn't crash - you can also check its progress with the command: ```bash sudo journalctl -feu akkoma ``` You might get an error about tzdata - this should be OK. You should see something like the following in the logs at some point: ``` Sep 28 05:02:57 tingus.raccoons.today mix[36029]: 05:02:57.931 [info] Running Pleroma.Web.Endpoint with cowboy 2.12.0 at 127.0.0.1:4000 (http) Sep 28 05:02:57 tingus.raccoons.today mix[36029]: 05:02:57.932 [info] Access Pleroma.Web.Endpoint at https://tingus.raccoons.today ``` If you get there, try browsing to your instance and see what happens! [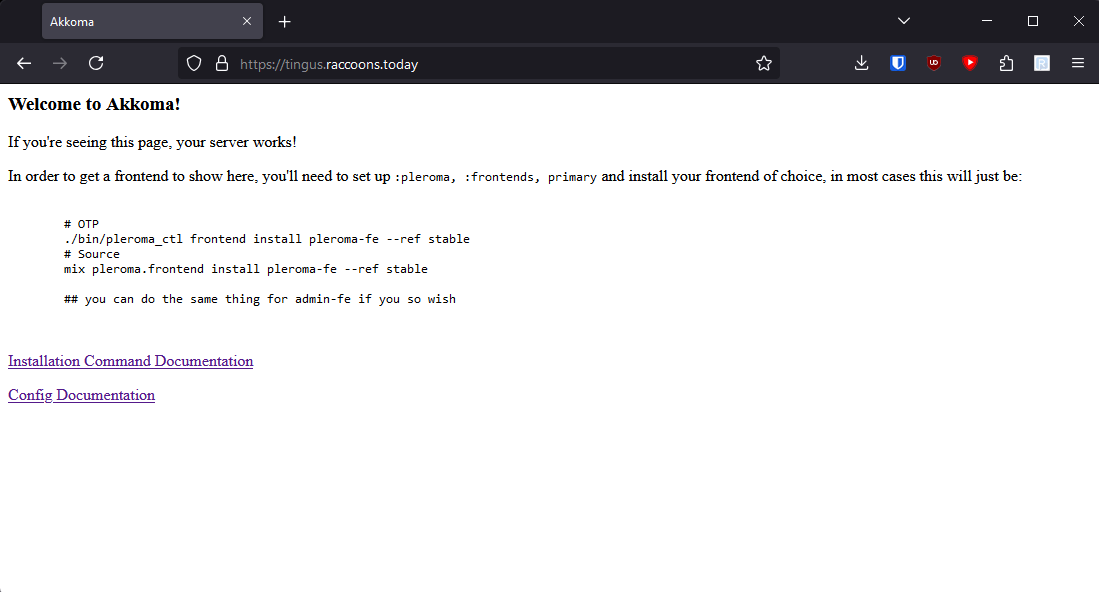](https://information.websiteleague.org/uploads/images/gallery/2024-09/DsIXJJEOFRAFXug2-screenshot-2024-09-28-010756.png) ...Ah, right, we need to install a frontend. And create your user account, that too. #### Create a User and Install a Frontend We'll need to log back into the Akkoma user *again* and go back to the install directory: ```bash sudo su -l akkoma -s $SHELL cd /opt/akkoma/ ```If you changed your config earlier to require E-mail confirmation, you'll likely want to disable that now, **before** creating your account, just in case it's not working - it doesn't appear like you can confirm E-mails via the console.
Then, run this command to create a user, replacing <username> with your desired username and <your@emailaddress> with your E-mail address: ```bash MIX_ENV=prod mix pleroma.user newAs of the time of writing this guide, there is not an automated procedure to add domains to the allowlist. One will be made in the future - in the interim, this guide will include steps on how to configure it and add domains manually.
Note that, even after adding all the domains to the allowlist, if you just started your instance (and haven't pre-emptively had your instance added to the Website League node list), it's likely other instances haven't added your domain to their allowlist yet, and so looking up their information will fail until they update their allowlists.
Click on the little speedometer icon on the top right of the screen, or go to https://<your-instance-domain>/pleroma/admin/. Once in the admin control panel, go to Settings, then MRF. Under Policies, add "SimplePolicy" and "FollowAllowlistPolicy", and then disable MRF transparency: [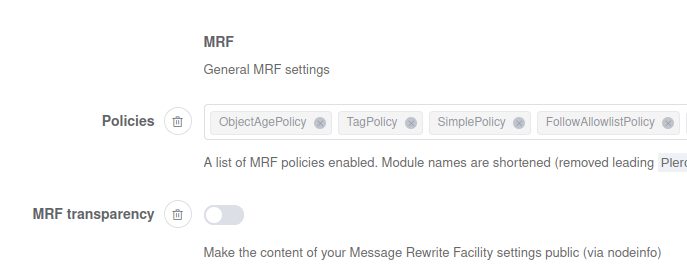](https://information.websiteleague.org/uploads/images/gallery/2024-10/WEDmJvynb1aXgL1m-image.png) Then, scroll down to the MRF Simple section, then under Accept, add each Website League domain, and put whatever you'd like under Reason (for your records): [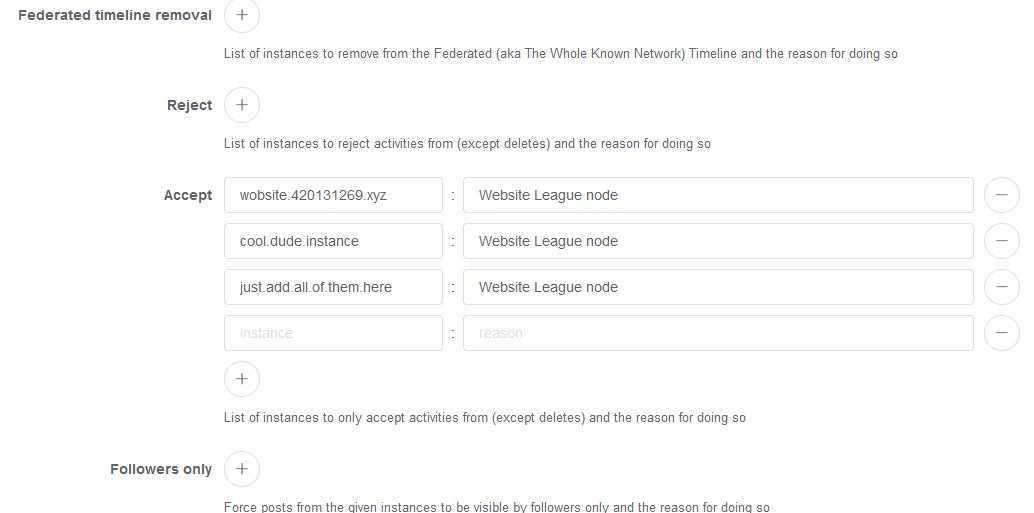](https://information.websiteleague.org/uploads/images/gallery/2024-09/eQdGV1s1D2ThBcNX-screenshot-2024-09-28-013319.png) Also scroll down to the MRF Follow Allowlist section and set the values as follows: [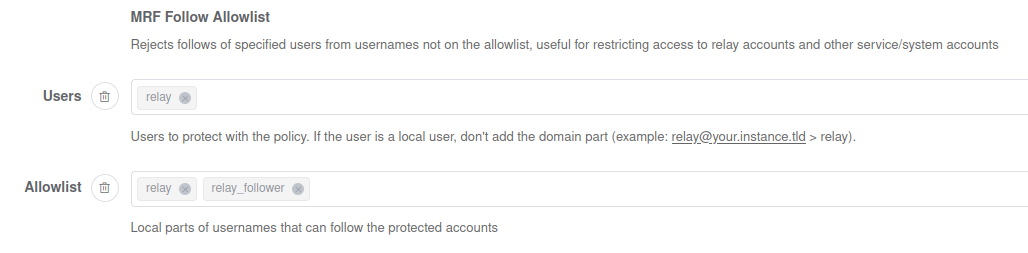](https://information.websiteleague.org/uploads/images/gallery/2024-10/yqSanmgMmMXOb4lh-image.png) Hit Submit, and you're good to go - by adding domains to the Accept list, your instance has automatically switched to allowlist federation, and the follow allowlist will restrict access to the relay account we're about to enable (we don't want normal users to be able to follow it because the relay accounts can be used to approximate a federated timeline). Additionally, change the following settings: - ActivityPub > Enable "Authorized Fetch mode" - This sets Akkoma up so that instances have to sign their requests to receive data. Important to avoid leaks. - Frontend > Enable "Hide post stats" and "Hide user stats" - No numbers, please. - Instance > Disable "Federated timeline available" - No federated timeline. - Instance > Enable "Allow Relay" - This will allow allowlisted instances (just the Website League!) to get all public posts on your instance, which improves federation a *lot.* This will also enable a system relay account (the one we've just secured with the follow allowlist policy) that instances without native relay support can use to receive activities. - Relays - This is a list of relays that your instance will fetch posts from. Put Website League Akkoma instances' URLs here, with /relay appended. For example, the relay for https://league.example.tld will be "https://league.example.tld/relay". This allows your instance to see more posts across the League, which makes tags work *a lot* better. Only put Website League URLs here. ##### Other Config to Set Take a look through all the settings - there's a few things you may want to change or tweak: - ActivityPub > Outgoing Blocks: Enable - This should be fine to enable in the Website League, as nodes are vetted and nobody should be installing anything that would abuse this to notify users if they have been blocked. - Anything in Frontend - It's your node - feel free to customize it! - Anything in Instance - Change the description, bump up the limit to something nice (50k seems fine) - Specific items in Instance: - **Registrations Open**: Disable this if you're invite only or a single user node. - **Account approval required**: You must enable this if your registrations are open. - **Invites Enabled**: Enable if you want to enable invites. - **Account activation required**: Enable this if you want folks to validate their E-mails **and you can confirm Akkoma successfully sends E-mails.** - **Public**: Disable if you wish to limit access from unauthenticated folks seeing stuff from your instance. - Anything in Mailer if you want to send E-mails - Other > Terms of Service - Put together a terms of service for your node specifically if you'd like! Make sure to save your settings once you're done changing them! You can change the favicon by placing `favicon.png` in `/opt/akkoma/instance/static` #### Manual Config Changes If you're not using the database config, below is the equivalent changes as to what were applied above that are necessary (still refer to the documentation for more): ``` config :pleroma, :mrf, policies: [ Pleroma.Web.ActivityPub.MRF.ObjectAgePolicy, Pleroma.Web.ActivityPub.MRF.TagPolicy, Pleroma.Web.ActivityPub.MRF.SimplePolicy ], transparency: false config :pleroma, :mrf_simple, accept: [ {"website-league-node.here", "Website League node"}, {"another-website-league-node.here", "Website League node"}, {"yet-another-node.here", "Website League node"}, # just keep adding a line like the 3 above for each node you want to add {"secret-fourth.node", "Website League Node"} # and the last one has no comma at the end ] config :pleroma, :activitypub, outgoing_blocks: true, authorized_fetch_mode: true config :pleroma, :instance, federated_timeline_available: false config :pleroma, :frontend_configurations, pleroma_fe: %{ hidePostStats: true, hideUserStats: true, redirectRootNoLogin: "/about" } ``` Additionally, regardless of whether you use database config or not, add the following if you wish to disable the local timeline: ``` config :pleroma, :instance, local_timeline_available: false config :pleroma, :frontend_configurations, pleroma_fe: %{ redirectRootNoLogin: "/about" } ``` For all other changes, the upstream configuration is a good (albeit not entirely exhaustive) source to find what everything does: [Configuration Cheatsheet](https://docs.akkoma.dev/stable/configuration/cheatsheet/)And with that, you should be done! If you're still here, thank you very much for following through, and congrats on your new instance! I hope this guide helped! If you have any problems or any questions, folks on [Zulip](https://coordination.websiteleague.org/#narrow/stream/20-Instance-Operators'-Helpdesk) should be able to help - the author of this guide included, Kit Lotor. Best of luck to you, and welcome to the Website League!
# Miscellaneous Procedures There are certain things you may want to do with your Akkoma install after the fact - for example, if you originally set up your instance to pull configuration from the config file, and you later wish to instead pull it from the database. This page is to guide you through such procedures. ##### Running Commands Note that for any **mix** command you run, you will want to run it as the **akkoma** user, and you will want to add "**MIX\_ENV=prod**" to the beginning. If you don't tell it anything, it will assume that you want to affect a **dev** environment, including pulling all of the config for the dev environment. This is not what we want - largely because it will **not use your config** (anything in prod.secrets.exs). You will **always** want to add MIX\_ENV=prod to the beginning of a mix command. If you installed Elixir and Erlang with asdf, you will need to go into a shell as the Akkoma user, navigate to the install directory, and run the command that way: ```bash sudo su -l akkoma -s $SHELL cd /opt/akkoma MIX_ENV=prod mix