Users Handbook
If you want to learn about posting on the league, start here!
- Using Akkoma
- Using GoToSocial
- Post Privacy Settings (or: what's the globe/lock icon next to a post mean?)
Using Akkoma
This is a mirror of the Akkoma-fe user guide. This guide was not written by the Website League, and has some information that is not relevant to League instances. It is a stopgap while we write a new guide for Akkoma users.
General overview
Be prepared for breaking changes, unexpected behavior and this user guide becoming obsolete and wrong.
If there was no insanity
it would be necessary to create it.
--Catbag
Akkoma-FE is the default user-facing frontend for Pleroma. If your instance uses Akkoma-FE, you can access it by going to your instance (e.g. https://pleroma.soykaf.com). After logging in you will have two columns in front of you. Here we're going to keep it to the default behaviour, but some instances swap the left and right columns. If you're on such an instance what we refer to as the left column will be on your right and vice versa.
Left column
- first block: This section is dedicated to posting
- second block: Here you can switch between the different views for the right column.
- Optional third block: This is the Instance panel that can be activated, but is deactivated by default. It's fully customisable by instance admins and by default has links to the Akkoma-FE and Mastodon-FE.
- fourth block: This is the Notifications block, here you will get notified whenever somebody mentions you, follows you, repeats or favorites one of your statuses
Right column
This is where the interesting stuff happens! There are different views depending on what you choose in the second block of the left panel.
- Timelines Depending on the timeline you will see different statuses, but each status has a standard structure:
- Profile pic, name and link to profile. An optional left-arrow if it's a reply to another status (hovering will reveal the reply-to status). Clicking on the profile pic will uncollapse the user's profile where you can find information about the account and can follow, mute or block the account.
- An arrow icon on the right side allows you to open the status on the instance where it's originating from.
- A
+button on the rightmost side allows you to Expand/Collapse an entire discussion thread. - The text of the status, including mentions and attachments. If you click on a mention, it will automatically open the profile page of that person.
- Four buttons (left to right): Reply, Repeat, Favorite and Add Reaction. The three dots next to it are a dropdown menu for extra options including simple moderation, bookmarking, deleting posts, pinning your own posts to your profile and more.
- Interactions shows all interactions you've had with people on the network, basically same as notifications except grouped in convenient way.
- Chats is the chat feature. You can find your friends and start chatting with them. At the moment chat are only one-on-one, but once groups are introduced groupchats will also be possible.
- About is the about-page and lists the staff, the TOS, activated MRF's, and enabled features
Top right
- The magnifier icon opens the search screen
- You can search for statuses, people and hashtags.
- You can import statuses from remote servers by pasting the url to the post in the search field.
- If you want to search for users that your instance doesn't know about yet, you can search for them using the full
name@instance.tldhandle. You can also use the full url from their remote profile.
- The gear icon gives you settings
- If you have admin rights, you'll see an icon that opens the admin interface
- The last icon is to log out
Bottom right
On the bottom right you have the Shoutbox. Here you can communicate with people on the same instance in realtime. It is local-only, very basic and will most probably be removed once the Chats functionality allows group chats.
Posting, reading, basic functions.
!!! warning Depending on your instance some of the options might not be available or have different defaults
After registering and logging in you're presented with your timeline in right column and new post form with timeline list and notifications in the left column.
Posts will contain the text you are posting, but some content will be modified:
- Mentions: Mentions have the form of @user or @user@instance.tld. These will become links to the user's profile. In addition, the mentioned user will always get a notification about the post they have been mentioned in, so only mention users that you want to receive this message.
- URLs: URLs like
http://example.comwill be automatically be turned into a clickable links. - Hashtags: Hashtags like #cofe will also be turned into links.
- There is a default character limit of 5000 characters.
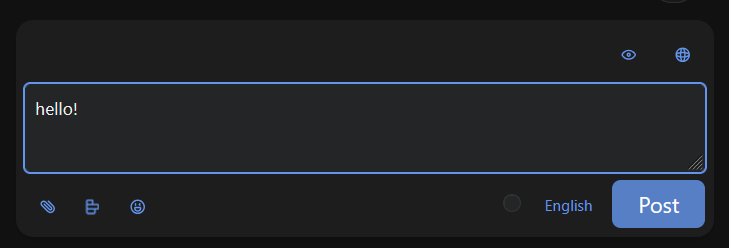
Let's clear up some basic stuff. When you post something it's called a post or it could be called a status or even a toot or a prööt depending on whom you ask. Post has body/content but it also has some other stuff in it - from attachments, visibility scope, subject line...
Emoji are small images embedded in text, there are two major types of emoji: unicode emoji and custom emoji. While unicode emoji are universal and standardized, they can appear differently depending on where you are using them or may not appear at all on older systems. Custom emoji are a more fun kind - instance administrator can define many images as custom emoji for their users. This works very simple - custom emoji is defined by its shortcode and an image, so that any shortcode enclosed in colons get replaced with image if such shortcode exist. Let's say there's a :akkoma: emoji defined on an instance. That means
First time using :akkoma: akkoma!
will become
First time using
akkoma!
Note that you can only use emoji defined on your instance, you cannot "copy" someone else's emoji, and will have to ask your administrator to copy emoji from other instance to yours. Lastly, there's two convenience options for emoji: an emoji picker (smiley face to the right of "submit" button) and autocomplete suggestions - when you start typing :shortcode: it will automatically try to suggest you emoji and complete the shortcode for you if you select one. If emoji doesn't show up in suggestions nor in emoji picker it means there's no such emoji on your instance, if shortcode doesn't match any defined emoji it will appear as text.
Attachments are fairly simple - you can attach any file to a post as long as the file is within maximum size limits. If you're uploading explicit material you can mark all of your attachments as sensitive (or add the #nsfw tag) - it will hide the images and videos behind a warning so that it won't be displayed instantly.
Subject line also known as CW (Content Warning) could be used as a header to the post and/or to warn others about contents of the post having something that might upset somebody or something among those lines. Several applications allow to hide post content leaving only subject line visible. Using a subject line will not mark your images as sensitive, you will have to do that explicitly (see above).
Visiblity scope controls who will be able to see your posts. There are four scopes available:
Public: This is the default, and some fediverse software, like GNU Social, only supports this. This means that your post is accessible by anyone and will be shown in the public timelines.Unlisted: This is the same as public, but your post won't appear in the public timelines. The post will still be accessible by anyone who comes across it (for example, by looking at your profile) or by direct linking. They will also appear in public searches.Followers only: This will show your post only to your followers. Only they will be able to interact with it. Be careful: When somebody follows you, they will be able to see all your previousfollowers onlyposts as well! If you want to restrict who can follow you, consider locking your account down to only approved followers.Direct: This will only send the message to the people explicitly mentioned in the post.
A few things to consider about the security and usage of these scopes:
- None of these options will change the fact that the messages are all saved in the database unencrypted. They will be visible to your server admin and to any other admin of a server who receives this post. Do not share information that you would consider secret or dangerous. Use encrypted messaging systems for these things.
- Follower-only posts can lead to fragmented conversations. If you post a follower-only post and somebody else replies to it with a follower-only post, only people following both of you will see the whole conversation thread. Everybody else will only see half of it. Keep this in mind and keep conversations public if possible.
- Changing scopes during a thread or adding people to a direct message will not retroactively make them see the whole conversation. If you add someone to a direct message conversation, they will not see the post that happened before they were mentioned.
- Reply-to if you are replying to someone, your post will also contain a note that your post is referring to the post you're replying to. Person you're replying to will receive a notification even if you remove them from mentioned people. You won't receive notifications when replying to your own posts, but it's useful to reply to your own posts to provide people some context if it's a follow-up to a previous post. There's a small "Reply to ..." label under post author's name which you can hover on to see what post it's referring to.
Sometimes you may encounter posts that seem different than what they are supposed to. For example, you might see a direct message without any mentions in the text. This can happen because internally, the Fediverse has a different addressing mechanism similar to email, with to and cc fields. While these are not directly accessible in Akkoma-FE, other software in the Fediverse might generate those posts. Do not worry in these cases, these are normal and not a bug.
Rich text
By default new posts you make are plaintext, meaning you can't make text bold or add custom links or make lists or anything like that. However if your instance allows it you can use Markdown or BBCode or HTML to spice up your text, however there are certain limitations to what HTML tags and what features of Markdown you can use.
Here is a small example of some text in markdown.
This is an example of markdown text using **bold** and *cursive* text.
To get a newline we add two spaces at the end of the previous line.

Let's also add a list

* with
* some
* items
If you set the input-method to Markdown, and post this, it will look something like

Misskey markdown
Akkoma-FE includes support for writing and rendering misskey markdown (MFM). To write this you will need to select "MFM" from the content type dropdown (if supported), and then you can format text in MFM.
To render MFM, you will need to turn on "Render Misskey Markdown" in the settings modal.
Other actions
In addition to posting you can also favorite posts also known as liking them and repeat posts (also known as retweeting, boosting and even reprööting). Favoriting a post increments a counter on it, notifies the post author of your affection towards that post and also adds that post to your "favorited" posts list (in your own profile, "Favorites" tab). Reprööting a post does all that and also repeats this post to your followers and your profile page with a note "user repeated post".
Your own posts can be deleted, but this will only reliably delete the post from your own instance. Other instances will receive a deletion notice, but there's no way to force them to actually delete a post. In addition, not all instances that contain the message might even receive the deletion notice, because they might be offline or not known to have the post because they received it through a repeat. Lastly, deletion notice might not reach certain frontends and clients - post will be visible for them until page refresh or cache clear, they probably won't be able to interact with it apart from replying to it (which will have reply-to mark missing).
If you are a moderator, you can also delete posts by other people. If those people are on your instance, it will delete the post and send out the deletion notice to other servers. If they are not on your instance, it will just remove the post from your local instance.
There's also an option to report a user's post which can be used to notify your (and optionally the other instance's) admin that someone is being naughty.
Settings
On the top-right you will see a gear icon. Click it to open the settings.
General
Interface
- Interface language is where you can set the interface language. The default language is the one that you set in your browser settings.
- Hide instance-specific panel hides the panel in the lower left that usually contains general information about the server. This will only be visible if your admin has activated this panel and is deactivated by default.
Timeline
- Hide posts of muted users If this is set, 'muting' a user will completely hide their posts instead of collapsing them.
- Collapse posts with subjects This will collapse posts that contain a subject, hiding their content. Subjects are also sometimes called content warnings.
- Enable automatic streaming of new posts when scrolled to the top With this enabled, new posts will automatically stream in when you are scrolled to the top. Otherwise, you will see a button on the timeline that will let you display the new posts.
- Pause streaming when tab is not focused This pauses the automatic streaming that the previous option enables when the tab is out of focus. This is useful if you don't want to miss any new posts.
- Enable automatic loading when scrolled to the bottom When this is disabled, a button will be shown on the bottom of the timeline that will let you load older posts.
- Enable reply-link preview on hover Status posts in the timeline and notifications contain links to replies and to the post they are a reply to. If this setting is enabled, hovering over that link will display that linked post in a small hovering overlay.
Composing
- Copy scope when replying makes the scope of a reply be the same as the scope of the post it is replying to. This is useful to prevent accidentally moving private discussions to public, or vice versa.
- Always show subject field Whether or not to display the 'subject' input field in the post form. If you do not want to use subjects, you can deactivate this.
- Copy subject when replying controls if the subject of a post will be copied from the post it is replying to.
- Post status content type selects the default content type of your post. The options are: Plain text, HTML, BBCode and Markdown.
- Minimize scope selection options will reduce the visibility scopes to 'direct', your default post scope and post scope of post you're replying to.
- Automatically hide New Post button hides the floating "New post" button when scrolling on mobile view.
- Pad emoji with spaces when adding from picker Will add spaces around emoji you select it from the picker.
Attachments
- Hide attachments in timeline Do not display attachments in timelines. They will still display in expanded conversations. This is useful to save bandwidth and for browsing in public.
- Hide attachments in conversations Also hide attachments in expanded conversations.
- Maximum amount of thumbnails per post Exactly that :)
- Enable clickthrough NSFW attachment hiding Hide attachments that are marked as NSFW/sensitive behind a click-through image.`
- Preload images This will preload the hidden images so that they display faster when clicking through.
- Open NSFW attachments with just one click Directly open NSFW attachments in a maximised state instead of revealing the image thumbnail.
- Play-on-hover GIFs With this activated, GIFs images and avatars will only be animated on mouse hover. Otherwise, they will be always animated. This is very useful if your timeline looks too flashy from people's animated avatars and eases the CPU load.
- Loop videos Whether to loop videos indefinitely.
- Loop only videos without sound Some instances will use videos without sounds instead of GIFs. This will make only those videos autoplay.
- Play videos directly in the media viewer Play videos right in the timeline instead of opening it in a modal
- Don't crop the attachment in thumbnails if enabled, images in attachments will be fit entirely inside the container instead of being zoomed in and cropped.
Notifications
- Enable web push notifications this enables Web Push notifications, to allow receiving notifications even when the page isn't opened, doesn't affect regular notifications.
Fun
- Meme arrows will make
> greentextbe shown in green (using the "green" from the theme that is used).
Profile
Here you can set up how you appear to other users among with some other settings:
- Name is text that displays next to your avatar in posts. Please note that you cannot change your @handle
- Bio will be displayed under your profile - you can put anything you want there you want for everyone to see.
- Restrict your account to approved followers only makes your account "locked", when people follow you - you have to approve or deny their follow requests, this gives more control over who sees your followers only posts.
- Default visibility scope is your default post scope for new posts
- Strip rich text from all posts strips rich text formatting (bold/italics/lists etc) from all incoming posts. This will only affect newly fetched posts.
If you're admin or moderator on your instance you also get Show [role] badge in my profile - this controls whether to show "Admin" or "Moderator** label on your profile page.
For all options mentioned above you have to click "Submit" button for changes to take place
- Avatar this changes picture next to your posts. Your avatar shouldn't exceed 2 MiB (2097152 bytes) or it could cause problems with certain instances.
- Banner this changes background on your profile card. Same as avatar it shouldn't exceed 2 MiB limit.
- Profile Background this changes background picture for UI. It isn't shown to anyone else yet, but some time later it will be shown when viewing your profisle.
Security
Here you can change your password, revoke access tokens, configure 2-factor authentication (if available).
Filtering
- Types of notifications to show This controls what kind of notifications will appear in notification column and which notifications to get in your system outside the web page
- Replies in timeline You may know that other social networks like Twitter will often not display replies to other people in your timeline, even if you are following the poster. Pleroma usually will show these posts to you to encourage conversation. If you do not like this behavior, you can change it here.
- Hide post statistics This hides the number of favorites, number of replies, etc.
- Hide user statistics This hides the number of followers, friends, etc.
- Muted words allows a list of words that will be muted (i.e. displayed in a collapsed state) on the timeline and in notifications. An easy way to tune down noise in your timeline. By default posts can be expanded if you want to see them.
- Hide filtered statuses will hide the filtered / muted posts completely instead of collapsing them.
Theme
Here you can change the look and feel of Akkoma-FE. You can choose from several instance-provided presets and you can load one from file and save current theme to file. Before you apply new theme you can see what it will look like approximately in preview section.
The themes engine was made to be easy to use while giving an option for powerful in-depth customization - you can just tweak colors on "Common" tab and leave everything else as is.
If there's a little check box next to a color picker it means that color is optional and unless checked will be automatically picked based on some other color or defaults.
For some features you can also adjust transparency of it by changing its opacity, you just need to tick checkbox next to it, otherwise it will be using default opacity.
Contrast information is also provided - you can see how readable text is based on contrast between text color and background, icons under color pickers represent contrast rating based on WCAG - thumbs up means AAA rating (good), half-filled circle means AA rating (acceptable) and warning icon means it doesn't pass the minimal contrast requirement and probably will be less readable, especially for vision-challenged people, you can hover over icon to see more detailed information. Please note that if background is not opaque (opacity != 1) contrast will be measured based on "worst case scenario", i.e. behind semi-transparent background lies some solid color that makes text harder to read, this however is still inaccurate because it doesn't account that background can be noisy/busy, making text even harder to read.
Apart from colors you can also tweak shadow and lighting, which is used mostly to give buttons proper relief based on their state, give panes their shade, make things glow etc. It's quite powerful, and basically provides somewhat convenient interface for CSS Shadows.
Another thing you can tweak is theme's roundness - some people like sharp edges, some want things more rounded. This is also used if you want circled or square avatars.
Lastly, you can redefine fonts used in UI without changing fonts in your browser or system, this however requires you to enter font's full name and having that font installed on your system.
Notifications
This screen allows more fine-grained control over what notifications to show to you based on whom it comes from.
Data Import/Export
This allows you to export and import a list of people you follow and block, in case instance's database gets reverted or if you want to move to another server. Note that you CANNOT export/import list of people who follow you, they'll need to follow you back themselves.
Mutes and Blocks
These screens give access to full list of people you block/mute, useful for unblocking/unmuting people because blocking/muting them most likely removes them out of your sight completely.
Version
Just displays the backend and frontend version. Useful to mention in bug reports.
Timelines
You have several timelines to browse trough
- Timeline aka Home Timeline - this timeline contains all posts by people you follow and your own posts, as well as posts mentioning you directly.
- Bookmarks all the posts you've bookmarked. You can bookmark a post by clicking the three dots on the bottom right of the post and choose Bookmark.
- Direct Messages all posts with
directscope addressed to you or mentioning you. - Public Timelines all public posts made by users on the instance you're on
- Bubble Timeline all public posts from instances recommended by your admin(s) in the instance settings. This won't appear if they haven't set anything up for it.
- The Whole Known Network also known as TWKN or Federated Timeline - all public posts known by your instance. Due to nature of the network your instance may not know all the posts on the network, so only posts known by your instance are shown there.
Note that by default you will see all posts made by other users on your Home Timeline, this contrast behavior of Twitter and Mastodon, which shows you only non-reply posts and replies to people you follow. You can change said behavior in the settings.
By default instances will try to send activities (e.g. posts, favorites, etc.) up to 7 days or until the target server received them. For this reason posts that are up to 7 days old and your server didn't know about yet can pop up on your timeline. This is the default behaviour and can be changed by your admin.
Users: follow, mute, block
When you see someone, you can click on their user picture to view their profile, and click on the userpic in that to see full profile. You can follow them, mute and block them.
Following is self-explanatory, it adds them to your Home Timeline, lists you as a follower and gives you access to follower-only posts if they have any.
Muting collapses posts and notifications made by them, giving you an option to see the post if you're curious. Clients other than Akkoma-FE may completely remove their posts.
Blocking a user removes them from your timeline and notifications and prevents them from following you (automatically unfollows them from you).
Please note that some users can be "locked", meaning instead of following them you send a follow request they need to approve for you to become their follower.
Using GoToSocial
Tips on how to get started with and use GoToSocial, one of the servers which powers some of Website League's nodes
Introduction
Accounts on Website League have the form "@username@node.domain". username is the name of your account and node.domain is the name of your node (sometimes referred to as an instance).
Unlike most websites which you can interact with directly, the GoToSocial software does not include a full "frontend" website. Instead, to use GoToSocial, you get to choose what frontend (aka client) you'll use, which will affect how the website feels to use.
You can switch between frontends at any time, or even use multiple different ones simultaneously if you want to. All you need to do is log in and you're ready to post.
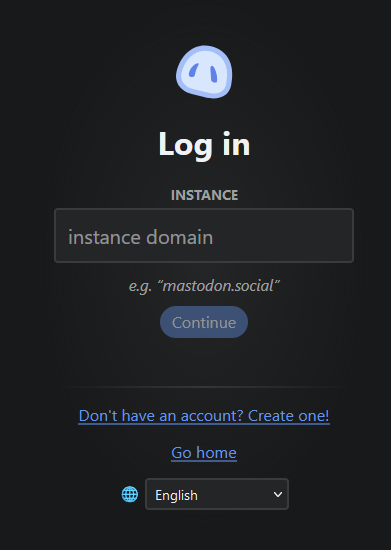
Every time you want to log in, you'll need to first enter your node's domain- that's how the frontend knows which GoToSocial node to talk to.
Setting up your profile
To access your settings, you'll need to go to the address bar of your web browser and enter:
node.domain/settings
Examples: (please feel free to add more nodes here for convenience)
The first time you go to /settings, GoToSocial will ask you to log in.
'Profile' settings
After you've logged in, you'll be able to configure your profile - this is where you can set your avatar and header image, bio, display name, and more.
Under the Visibility and privacy section, you can set the visibility level of your posts. This affects which of your posts will be visible on your public profile to users that aren't logged in and aren't following you from another node. The default is only show Public posts on your profile, so Unlisted posts will be hidden.
'Posts' settings
Two important settings here are:
- Default post privacy: This configures what privacy level new posts you write will have.
- Default post (and bio) format: If you want to use markdown in posts, change this to markdown.
'Interaction Policies' are also configurable here, they give you fine-grained control over who can interact with your posts, and in what way. If you set any interaction policies that require approvals, the 'Interaction Requests' page is where you can approve interactions. For more information see the GoToSocial docs.
Posting with Phanpy
Phanpy is one of the options for a frontend to use with GoToSocial.
To get started, open https://phanpy.social.
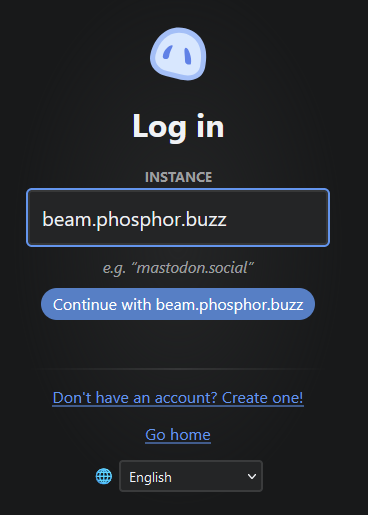
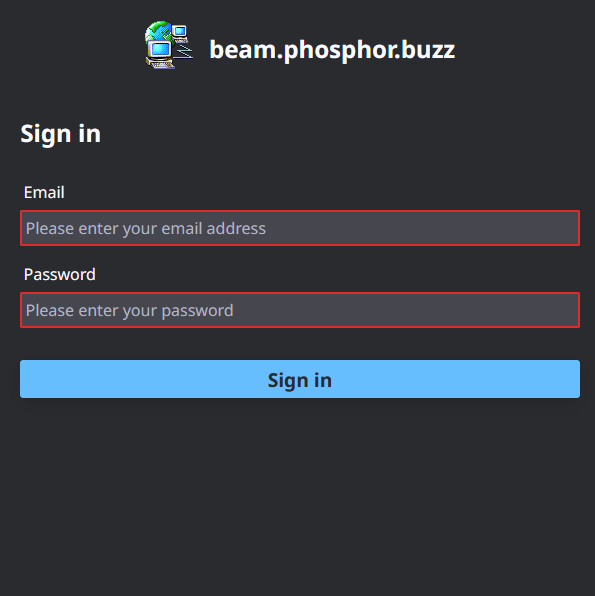
Then, click 'Log in with Mastodon'. Phanpy will ask you for your instance domain (node domain). After you enter that, your browser will redirect back to your node, where you can log in.
 |
|
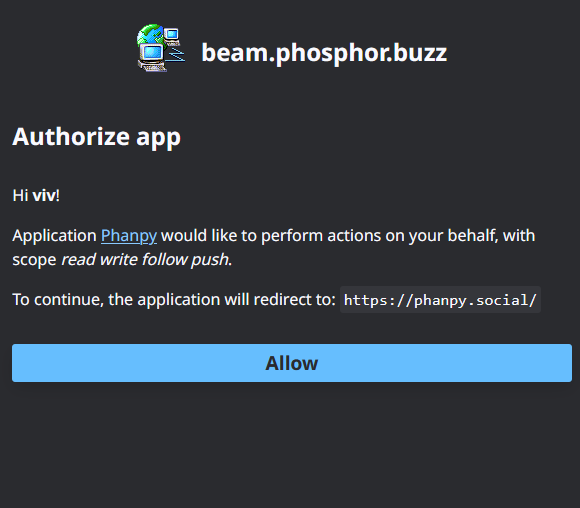
After you log in, GoToSocial will ask if you really wanted to log in to Phanpy. Click 'allow'. That will send you back to Phanpy, where you'll be logged in.
 |
 |
Now you can write your first post. Tap this button in the bottom right corner:
| Button |
What it does |
|
|
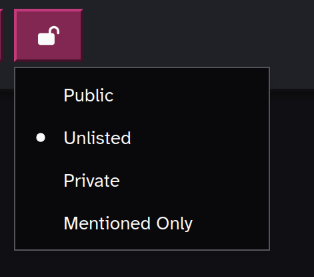
This button is where you configure the visibility level of the post you're about to write. For more information about what these levels mean, see GoToSocial's docs. |
|
|
This lets you add or remove a content warning from your post. |
|
|
This lets you attach images and other media. Phanpy also supports pasting images from your clipboard directly into your post. |
|
|
This lets you attach a poll to your post |
|
|
This lets you insert an emoji into your post. Your node may have custom emoji configured! |
|
|
This changes the language of your post, which will be displayed in some frontends. |
|
|
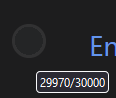
This circle is a tiny graph that fills up as you approach the character limit on your node. If your node's character limit is large enough, it's probably just going to look like an empty circle most of the time. |
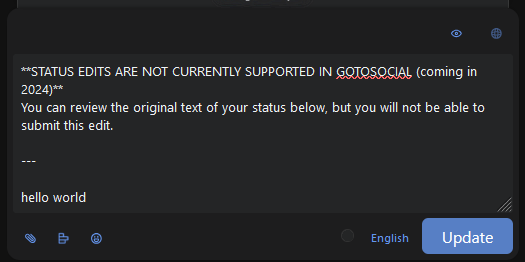
|
|
This sends the post. Note that at the time of writing (September 2024), GoToSocial does not support editing posts after they've been created. If you try to edit a post, the editor will pop up with a warning about that, like this:
|


GoToSocial frontends
Here are some of your frontend options for using a GoToSocial node. This isn't an exhaustive list- many Mastodon clients are also compatible with GoToSocial.
Phanpy
A frontend with a large number of features. See Phanpy's readme for an introduction.
Enafore / Semaphore
https://enafore.social/ and https://semaphore.social/ are lightweight clients based on the Pinafore project which was retired in 2023.
Others
List of Mastodon clients, many of which are compatible with GoToSocial.
Post Privacy Settings (or: what's the globe/lock icon next to a post mean?)
One of the unique architectural decisions mastodon made early on is to track "post privacy" or "post visibility" on a per-post basis.
This is represented in pillbug by this dropdown:
and in Akkoma by this row of icons:
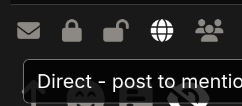
The exact options available will depend on which backend your node runs on.
On Akkoma:
- "Direct/Mentioned Only" - only allows people mentioned in the post to see it. this is effectively equivalent to "DMs", but these shouldn't be considered "really private": node operators can see them too, and they're unencrypted.
- "Private/Followers Only" - only allows followers to see the post, as well as anybody you tag in the post. You can emulate a twitter/Cohost-style locked account by enabling "Restrict your account to approved followers only" in the profile tab, and only posting in private mode
- "Unlisted" - Anybody can see this post, but it won't show up in "instance feed" or in tag searches.
- "Public" - Anybody can see this post, and it may show up via these other discovery mechanisms.
- "Mutuals Only" - this post will only be visible if you follow the viewer, and the viewer follows you, or if someone is mentioned.
By default, most people may be leery of the "Public" choice, and for good reason: on larger social media platforms, do you really want random strangers finding you through some unknowable algorithm and leaving bizarre replies? Even on the Website League, the same logic sort of applies; but as a result of its smallness and invite-only registration, you can at least be a little confident that a Stranger will be the right kind of Strange. That, and, well, there's no magic discovery algorithm to push your post.
Replies
Ok, so. Replies are a bit weird when it comes to privacy rules. By default, the post compose will inherit the privacy setting of the parent comment. this means, if it's unlisted, your reply will be unlisted, if it's a direct message, your reply will be direct too. But! you can set that yourself. so if you'd like to DM somebody about a post they made, you can make it a reply, but make it a "direct" visibility, and only they (and other tagged users) will see it.
This leads to a weird situation with private posts, specifically. you can reply to a private post, but your response will be "private", too. this means, only people who follow you can see it! It's common in practice to see one side of a conversation thread, because you follow one user in it and not the other. This is not the ideal behavior, we admit, but it is what we inherited from Mastodon.
If you want to privately reply to somebody who made a private post, but they don't follow you, fret not. the act of replying them counts as mentioning them, so they'll be included in the thread too. Just not any of their followers/people not mentioned.