Installing Akkoma
This page makes the following assumptions:
- You have a running VPS, prepared according to the instructions in Preparing Your VPS.
- You have a domain name that's pointed to your VPS.
If either of these aren't true, please read through the last three pages.
We're now going to download, install, and configure Akkoma, as well as some dependencies and a few other services we'll need to make this work: specifically, Caddy and PostgreSQL.
PostgreSQL is used to store information, such as account details, user posts, and the like. Caddy is something called a "reverse proxy" - think of it like opening a portal from the outside world into a specific application within your VPS. Caddy also does some other heavy lifting for us, such as getting SSL certificates (which allow folks and other servers to securely connect to your instance).
We are doing this install from source. Installing from OTP as broken, as a necessary dependency has been removed from Ubuntu 24.04. This guide is based off of, and uses much of the same commands as, the upstream documentation: Installing on Debian Based Distributions
Installing Dependencies
We have a few things we need to install - namely, PostgreSQL, Caddy, and a handful of dependencies - some required to build and run Akkoma, and a few required to enable useful features:
sudo apt install git build-essential postgresql postgresql-contrib cmake libmagic-dev elixir erlang-dev erlang-nox imagemagick ffmpeg libimage-exiftool-perl caddyBefore we continue, let's create the Akkoma system user - we'll need it eventually, but we may need it very soon:
sudo useradd -r -s /bin/false -m -d /var/lib/akkoma -U akkomaRun the following command, and ensure you have at least OTP 25 and Elixir 1.14:
elixir --versionIf you at least meet those versions, skip directly to Tuning Postgres. If not, uninstall Elixir and Erlang, then proceed with the next section, Installing asdf:
sudo apt remove elixir erlang-dev erlang-nox
sudo apt autoremove
Installing Elixir and Erlang with asdf
asdf is an application that effectively manages versions of different applications available to a given project. We will be using it to install a recent version of Erlang and Elixir.
You're first going to need a few more dependencies:
sudo apt install -y curl unzip build-essential autoconf m4 libncurses5-dev libssh-dev unixodbc-dev xsltproc libxml2-utils libncurses-devNext, let's change to the akkoma user, then download asdf.
sudo su -l akkoma -s $SHELL
git clone https://github.com/asdf-vm/asdf.git /var/lib/akkoma/.asdf --branch v0.11.3
From now until Tuning Postgres, you will run all of these commands as the akkoma user.
Next, we'll add a few lines to the end of .bashrc, and then restart your akkoma shell.
cat <<EOT >> ~/.bashrc
. "$HOME/.asdf/asdf.sh"
# asdf completions
. "$HOME/.asdf/completions/asdf.bash"
EOT
exec $SHELL
Let's start compiling and installing Erlang, and then installing Elixir. Compiling Erlang will take a few moments!
asdf plugin add erlang https://github.com/asdf-vm/asdf-erlang.git
export KERL_CONFIGURE_OPTIONS="--disable-debug --without-javac"
asdf install erlang 25.3.2.5
asdf global erlang 25.3.2.5
asdf plugin-add elixir https://github.com/asdf-vm/asdf-elixir.git
asdf install elixir 1.15.4-otp-25
asdf global elixir 1.15.4-otp-25Finally, check the elixir version once again, to make sure you now have the right version:
elixir --versionIf it is indeed correct, go ahead and exit your akkoma shell back into root.
exitTuning Postgres
We're going to take a slight detour from the install documentation to tune PostgreSQL a little bit. This will help tweak the performance to work better with our kind of setup - including the fact we are on an SSD and can use SSD speeds.
The following tune was created using PGTune, and was created assuming a VPS with 4 GB of memory and 2 CPU cores (and I told the tune to only use 3 GB of memory.) If your specs are different, you may want to create your own tune. If you create your own tune, I also selected "Web Application" for database type, 100 max connections, and SSD storage.
Open postgresql.conf in nano:
sudo nano /etc/postgresql/16/main/postgresql.confFind the following settings in the file, and change them to read the following (including un-commenting them if they're commented out):
max_connections = 20
shared_buffers = 768MB
effective_cache_size = 2304MB
maintenance_work_mem = 192MB
checkpoint_completion_target = 0.9
wal_buffers = 16MB
default_statistics_target = 100
random_page_cost = 1.1
effective_io_concurrency = 200
work_mem = 19660kB
huge_pages = off
min_wal_size = 1GB
max_wal_size = 4GB
You can press Ctrl+W in Nano to run a search.
Then, enable and restart postgresql:
sudo systemctl enable postgresql
sudo systemctl restart postgresql
Installing and Configuring Akkoma
Make the directory Akkoma's gonna live in, then clone the stable version of the Website League fork:
sudo mkdir -p /opt/akkoma
sudo chown -R akkoma:akkoma /opt/akkoma
sudo -Hu akkoma git clone https://akkoma.dev/srxl/akkoma.git -b wl-stable /opt/akkoma
Switch to a shell as the Akkoma user, go into the Akkoma directory, and install dependencies.
sudo su -l akkoma -s $SHELL
cd /opt/akkoma
mix deps.get
If it asks you to install Hex, answer Yes.
From now until further notice, you will be running these commands as the akkoma user. If you didn't need to use asdf, you may be able to run these using sudo -Hu akkoma instead. (The author of this guide ran into problems trying to use sudo with asdf.)
Run this command to begin configuring your instance (after it compiles a bunch of dependencies):
MIX_ENV=prod mix pleroma.instance genIf it asks you to install rebar3, say yes.
Use the domain you set the A and AAAA records earlier for as your instance domain.
Use the domain you set the CNAME record earlier for as part of your media base URL:
https://media.awesome.instance/mediaWhen asked about if you want to store your config in the database, consider the following:
Storing your configuration in the database will allow you to edit your configuration using a web frontend, and many settings won't require an instance restart this way. However, anything you've configured in the database will override what's in your config file, which may be confusing.
In contrast, not storing your config in the database means your config file will always be perfectly accurate to how your instance is set up, but any changes (including adding an instance to the allowlist) will require editing the file and restarting the instance.
Note that I personally prefer setting config in the database (to avoid logging into the console, as well as restarting and re-compiling Akkoma with each config change), and this guide will continue assuming you are doing the same. If you do wish to stick to just the config file, though, do refer to the documentation for configuration settings: Configuration Cheat Sheet
Once done, it will create a few config files for you, as well as a robots.txt and a postgres setup script.
Rename the generated config so Akkoma will use it, then temporarily leave the Akkoma shell so you can then set up the database:
exit
sudo -Hu akkoma mv /opt/akkoma/config/{generated_config.exs,prod.secret.exs}
sudo -Hu postgres psql -f /opt/akkoma/config/setup_db.psql
sudo su -l akkoma -s $SHELL
cd /opt/akkoma/
Once back in the akkoma shell, in the /opt/akkoma/ directory, run database migrations real quick.
MIX_ENV=prod mix ecto.migrateOne more thing - we're going to make a quick edit to our generated config file:
nano config/prod.secret.exsSince we're using a version of Postgres later than 12, we can tell Akkoma to run more efficient queries by adding this bit of config under config :pleroma, Pleroma.Repo:
config :pleroma, Pleroma.Repo,
  prepare: :named,
  parameters: [
    plan_cache_mode: "force_custom_plan"
  ],
  <rest of the Pleroma.Repo config here>
Save, then exit the Akkoma user console again.
exitWe're getting close to finishing! Now we just need to set up the reverse proxy, Caddy, as well as the service for Akkoma!
Configuring Caddy
Assuming this is a brand new instance with an unconfigured install of Caddy, replace the current Caddy config file with the one from Akkoma, then open it up in an editor:
  sudo rm /etc/caddy/Caddyfile
  sudo cp /opt/akkoma/installation/caddy/Caddyfile /etc/caddy/Caddyfile
  sudo nano /etc/caddy/Caddyfile
Replace example.tld with your instance domain. Then, uncomment every line starting from media.example.tld, and replace media.example.tld with your media instance domain (the one you set the CNAME for.)
Enable and restart Caddy.
sudo systemctl enable caddy
sudo systemctl restart caddy
Configuring and Starting the Akkoma Service
Copy the systemd service file over from Akkoma's install directory, then open it with a text editor.
sudo cp /opt/akkoma/installation/akkoma.service /etc/systemd/system/akkoma.service
sudo nano /etc/systemd/system/akkoma.service
If you used asdf to install Elixir and Erlang earlier, follow the comments throughout the service file:
; Uncomment if using asdf to manage Elixir and Erlang
Environment="PATH=/var/lib/akkoma/.asdf/shims:/var/lib/akkoma/.asdf/bin:/usr/local/sbin:/usr/local/bin:/usr/sbin:/usr/bin:/sbin:/bin"

(...no changes to the config until a bit later in the file...)

; ExecStart=/usr/bin/mix phx.server
; If using asdf comment the above line and uncomment the one below instead
ExecStart=/var/lib/akkoma/.asdf/shims/mix phx.server
Double-check everything in the service file looks correct. Once you're sure, save and exit.
Reload systemctl config (just in case), then... it's time to enable and start your Akkoma instance:
sudo systemctl daemon-reload
sudo systemctl enable --now akkoma.service
Make sure it doesn't crash - you can also check its progress with the command:
sudo journalctl -feu akkomaYou might get an error about tzdata - this should be OK. You should see something like the following in the logs at some point:
Sep 28 05:02:57 tingus.raccoons.today mix[36029]: 05:02:57.931 [info] Running Pleroma.Web.Endpoint with cowboy 2.12.0 at 127.0.0.1:4000 (http)
Sep 28 05:02:57 tingus.raccoons.today mix[36029]: 05:02:57.932 [info] Access Pleroma.Web.Endpoint at https://tingus.raccoons.today
If you get there, try browsing to your instance and see what happens!
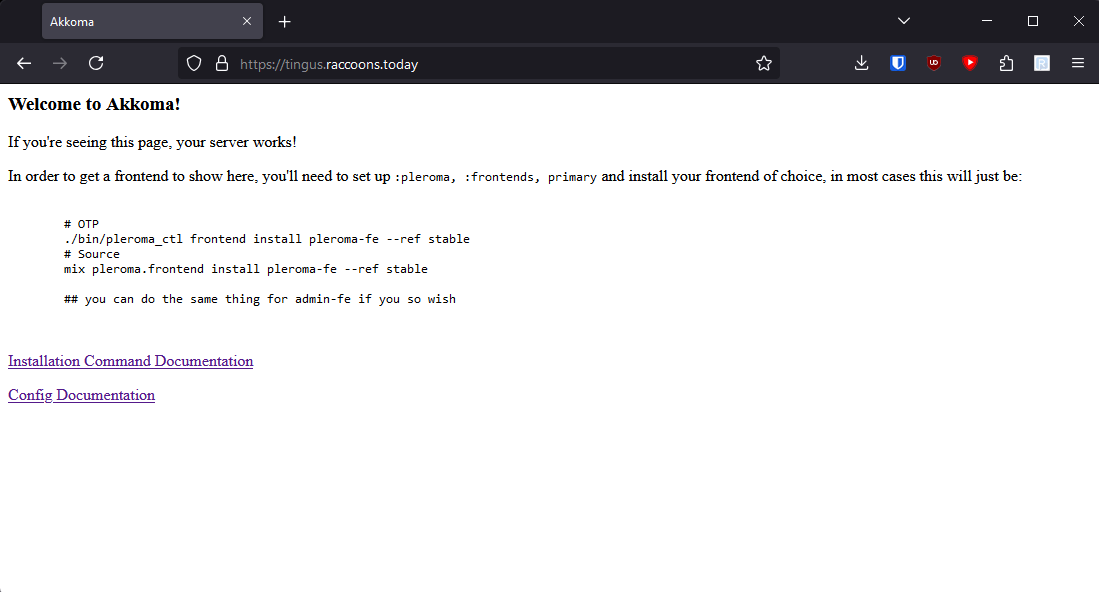
...Ah, right, we need to install a frontend. And create your user account, that too.
Create a User and Install a Frontend
We'll need to log back into the Akkoma user again and go back to the install directory:
sudo su -l akkoma -s $SHELL
cd /opt/akkoma/
If you changed your config earlier to require E-mail confirmation, you'll likely want to disable that now, before creating your account, just in case it's not working - it doesn't appear like you can confirm E-mails via the console.
Then, run this command to create a user, replacing <username> with your desired username and <your@emailaddress> with your E-mail address:
MIX_ENV=prod mix pleroma.user new <username> <your@emailaddress> --adminIt'll give you a reset password URL - go to that page in your browser to set your password.
and just run these commands to install the Website League fork of the main frontend (compiled and hosted by ruby@isincredibly.gay - thank you), as well as the admin frontend (if you enabled database configuration):
MIX_ENV=prod mix pleroma.frontend install pleroma-fe --ref stable --build-url https://media.posting.isincredibly.gay/_league/akkoma-fe-wl-stable.zip
MIX_ENV=prod mix pleroma.frontend install admin-fe --ref stable
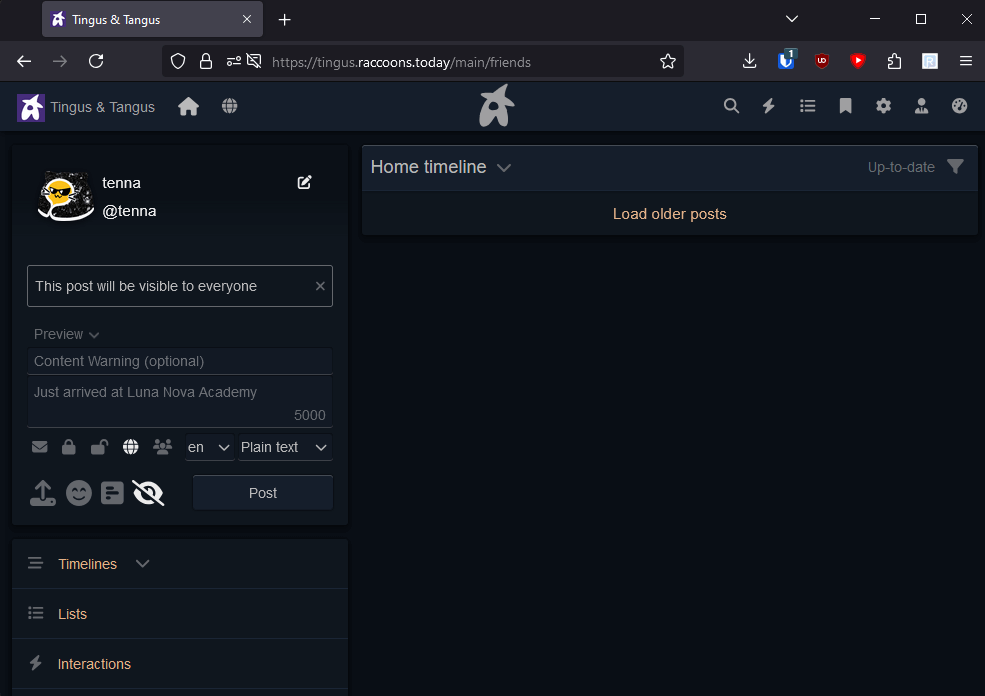
Now try browsing to your instance!
Now that's more like it! Also, make sure you can upload images as well, just to make sure your media domain is working properly.
...And we should probably make a few config changes real quick, since right now your instance is technically running on open, blocklist federation. We don't want that.
Switching to Allowlist Federation and Adding Domains
As of the time of writing this guide, there is not an automated procedure to add domains to the allowlist. One will be made in the future - in the interim, this guide will include steps on how to configure it and add domains manually.
Click on the little speedometer icon on the top right of the screen, or go to https://<your-instance-domain>/pleroma/admin/.
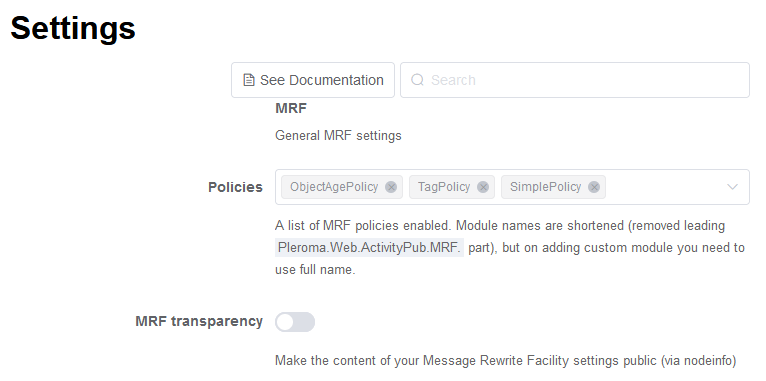
Once in the admin control panel, go to Settings, then MRF. Under Policies, add "SimplePolicy", and then disable MRF transparency:
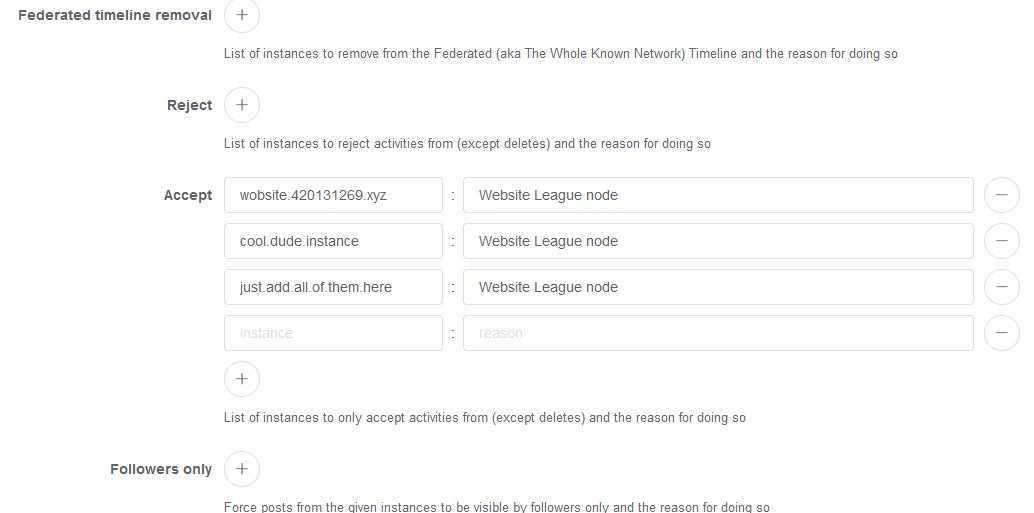
Then, scroll down to the MRF Simple section, then under Accept, add each Website League domain, and put whatever you'd like under Reason (for your records):
Hit Submit, and you're good to go - by adding domains to the Accept list, your instance has automatically switched to allowlist federation.


