New Node Setup Guide
Welcome to this guide for putting together a Website League node! Hosting a webserver on the public Internet can be a bit daunting, but hopefully this guide will help guide you through what's necessary to do so. There may be parts of the guide which are hard to understand, but try to take it slow, and if you need help, there's folks on the Discord who are willing to give assistance (the author of this guide included.) It's in this guide's author's opinion that everyone deserves to be able to have their own slice of the Internet, and knowledge should not be a barrier to that.
There's a few parts to setting up any webserver that uses ActivityPub - you have to obtain a domain name and a server, link the domain to the server, and then set up and configure your server to run your software of choice.
Planning a Node
Decisions
The two big things you can't change about your node once you've started it is your domain name, and your software. There are currently no known migration options for migrating from one federating software to another, and ActivityPub is extremely reliant on the domain name.
It’s effectively impossible to change either without effectively starting over with your instance, and re-using the same domain can have complications (although, you could use a (different) subdomain without problems.) You will want to make sure you are comfortable moving forward with the two things you choose in this regard.
Domain Name
As far as domain name goes, you’ll need to purchase it from a domain registrar - there are several options available to you in this regard. Choose one that's trustworthy, and one that you feel would have your back in the event of a security issue (i.e. your account gets hijacked.) The author of this document uses Porkbun, but there are other options out there; a few that have been mentioned are Namecheap, Glauca, and Cloudflare.
Keep in mind that name registrars will often offer a deeply discounted price for their domain names, and a much steeper price for subsequent years. Assuming you will be running this node for at least over a year, be mindful of what the normal renewal price will be, so you don't get stuck with a $40 renewal for what you thought was a $2 domain!
Once you've picked out your registrar of choice, go looking for a domain name! Keep in mind this domain will be at the end of your (and your users, if this is a multi-user node) username, so pick something that's both available and that you'd like at the end of your username! (For example, if you chose the domain sickos.social and your username was critter, your full username would be @critter@sickos.social.) You don't have to necessarily be elegant with this, but it can be fun coming up with a good domain!
Once you've come up with (and purchased) a good domain name for your instance, it's time to think about the software you'll use.
Fediverse Software
As far as software goes, you have a few options. The two known/adapted to work for the Website League as of writing this are GoToSocial and Akkoma.
There are other federating software choices out there - such as Sharkey or the well-known Mastodon, but these are not included here as they either lack features or have flaws which disqualify them for use with the Website League. You may be able to patch the software to make it work, but this is out of the scope of this guide.
Server
Now that you've picked what software you'd like to use, and the domain name you'd like, the last thing you need to choose is where to put your instance! There are, again, multiple options for this - Vultr, Hivelocity, Linode, DigitalOcean, and OVH are options. (Oracle is also an option, and you may be able to get it for free, with the caveat that it's Oracle. However, Oracle and Hetzner, two major hosting options, disallow adult content on their servers, which mostly takes them out of the running for use on a social network that permits adult content.) For this guide, we will be using Hivelocity.
Note the $4.20 "Starter" VM from OVH may be sufficient, as it touts 2 GB of RAM - however, the author of this guide has had negative experiences with OVH in the past, and tends to avoid using them as a result.
For this guide, you're going to be getting their $7 VM - that is, 2 vCPUs and 4 GB of memory. For your operating system, choose Ubuntu 24.04. Hit Add to Cart and then checkout.
Ubuntu is just one operating system: we're suggesting it here because the rest of the guide is written assuming you're using Ubuntu, but if you're already an experienced linux user and have a preference for another distribution, you're welcome to use that and adapt the few Ubuntu specific sections that there are.
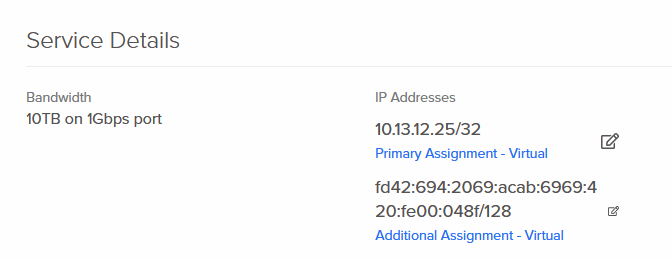
Once you've finished and logged in, you should be brought to your device list. You're now the proud owner of a virtual machine! Click on the one you just purchased, then "View All" under IP Assignments. Under "Service Details", take note of the IP addresses it's given you as we move on to the next section - configuring your domain name!
A Note About Email
Both Akkoma and GoToSocial have the capability to send email. Both can use email for verifying accounts during creation and various administrative tasks; Akkoma also uses email for password resets. (At the moment, password resets in GoToSocial can only be done via the command-line console, though logged in users can update their passwords from their settings page.) Neither explicitly requires a mail service, but your may want to consider using it to avoid having to handle these tasks by hand. Both support using either an internal mail server or an externally-hosted service and they can be configured to do so at any time with relative ease by editing their configuration files and relaunching. The configuration guide for GoToSocial can be found here in their documentation, and for Akkoma you can check the Configuration Cheat Sheet.
That said, not all hosting providers allow clients to run their own mail server, and the rules around doing so depend highly on the host. On top of that, it's a fair amount of additional work to do so, and outside the realm of what we can really cover here. There are a number of reliable mail services you can choose from on the relative cheap such as Mxroute, or you could find your own if you'd like. Unless you are certain you are both allowed to and know how to run your own mail server, it's probably best to avoid that route for now.
Setting Up your Domain Name
This page assumes you have, at a minimum, the following:
- A domain name you wish to use
- A VPS and its corresponding IP address as well as IPv6 address
If you don't have either, consider checking out the previous page, Planning a Node, then come back here once you have those.
It's now time to configure your domain name so that it links to your VPS, which will eventually hold your Website League node. For this guide, we will be using Porkbun, but whatever domain registrar you're using likely has its own interface for doing this.
Be careful if you're using Cloudflare to manage your domain - Cloudflare has been known before to cause federation issues by blocking server requests from time to time. You'll likely need to set up exceptions so it doesn't block federated traffic.
To link your domain to your VPS, you will create two records for the domain - an A record and an AAAA record. Computers don't inherently understand what a domain means, but they use records like this to translate domain names into IP addresses - which they do understand.
This complete guide will only cover setting up an instance on the same domain you will actually be hosting it from. It is possible to make where you host the instance differ from the instance name (the bit that goes at the end of your username), but this is a more advanced topic that can cause federation issues if done improperly. We will not be covering this in this guide.
Fill in the records with the following, replacing "awesome.instance" with your instance's domain:
| Record Type |
Host |
Answer |
| A |
awesome.instance | Your VPS's IP address |
| AAAA |
awesome.instance |
Your VPS's IPv6 address |
If you're using Akkoma, you'll need one more record:
| Record Type | Host | Answer |
| CNAME | media.awesome.instance | awesome.instance |
As you may be able to guess, a CNAME record basically points to another DNS record. We'll need the media subdomain as part of setting up Akkoma, but they're going to both be on the same server, so it makes sense to just have both refer to the same records.
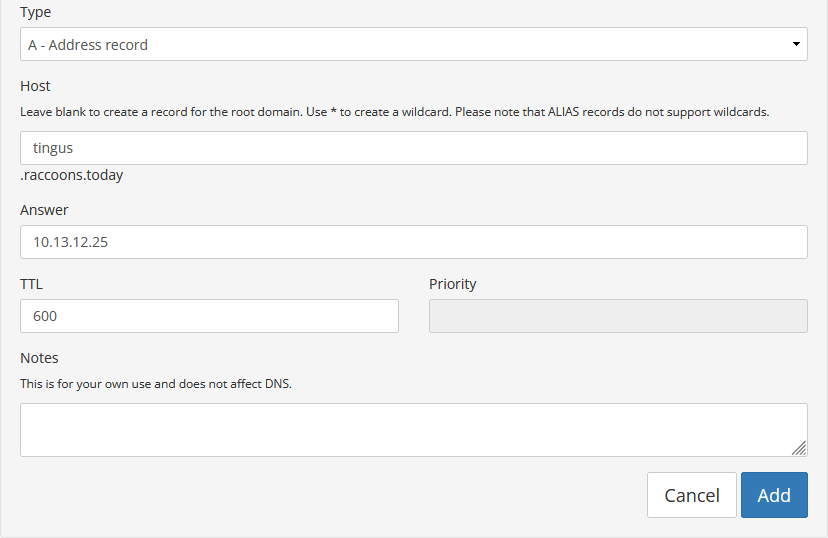
You can set the TTL to whatever you'd like. I like to set it to 300 to start for quick updates, then increase it down the line when it's less likely to change. Below is an example of what an A record might look like on Porkbun, if your IP address was 10.13.12.25 and your desired domain was tingus.raccoons.today:
Note: On Porkbun, if I wished to just host it on raccoons.today with no subdomain, I would just leave that box blank. This may be different depending on how your registrar is set up. Feel free to ask in the Discord if you're uncertain!
Once you're done with that, it's time to start setting up the server!
Preparing Your VPS
This page makes the following assumptions:
- You have a running VPS.
- You have a domain name that's pointed to your VPS.
If this is not the case, go through the first two pages, Planning a Node and Setting Up your Domain Name, then come back here.
Logging Into Your VPS
Your host should have given you a username and password - the user is likely root. If the user is not root, it's likely it has "sudo" permissions - meaning you can use it to become root once logged in (and you can disregard the "Creating a User Account" steps later in this guide.) You likely also have a console you can log in through on your host - and this is useful, especially if you goof something up and can't log in any other way - but it's more ideal to be able to log in through something called SSH. This basically gives you a command prompt directly into your server, and, among other things, it's likely much easier to copy-paste info to and from it.
Assuming you're running Windows, one program you can use for logging into SSH is called PuTTY. You'll want to download the MSI "Windows Installer" - likely 64-bit x86, or 32-bit x86 if your PC is really old. All the defaults should be fine. Once you start up PuTTY, you'll be presented with a window like this:
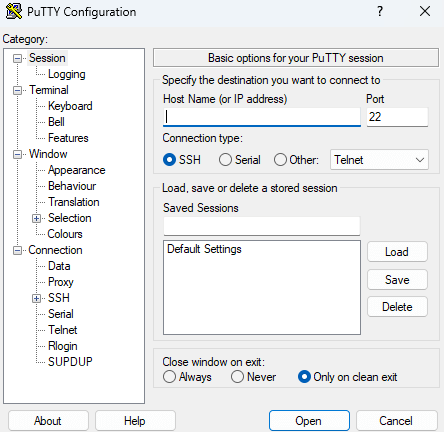
You'll put your VPS's IP address under "Host Name" and click Open, then press Accept. It'll then ask you for your username and password. Type in the details that your hosting provider gave you. Note that it won't show you typing any characters when entering your password - don't panic, that's by design. Once you do that, you should be in!
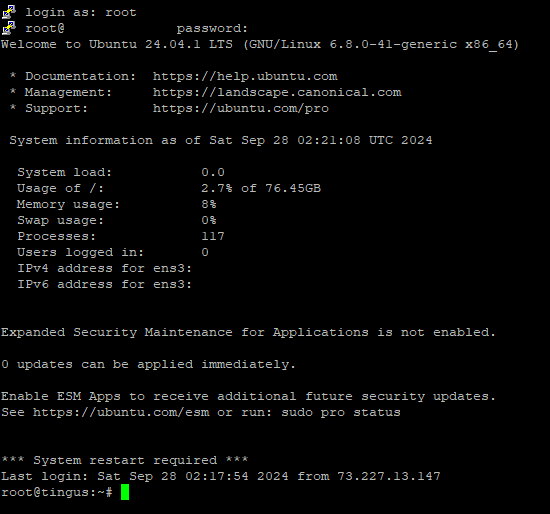
Before you continue, change the root password real quick by running this command:
passwdIt will ask you for a password. Type in whichever password you'd like, hit enter, and then type it in again. It should say "passwd: all authentication tokens updated successfully." If not, try again.
Let's also make sure nano is installed. This is a console text editor that's probably one of the friendlier options out there. (If you know you'd prefer vim/emacs, you can go ahead and use that instead!) Run this command:
apt install -y nanoIt should either install nano, or basically say "it's already the newest version, set to manually installed." Either way, you're good!
Securing Your VPS
At this point, you only have a root account with a password. While this technically works, this is not a good idea. The root account is one that has ultimate power over the server, and it's not one you typically want to be able to log directly into; instead, it's best to have a user account that you can then promote yourself to root through.
Creating a New User with Sudo Permissions
We're going to disable logging into the system as root over the internet. Instead, you're going to log in as a new user you're about to create, that can then be promoted to root using a command called "sudo". Run the following commands, replacing USERNAME_HERE with your desired username:
adduser USERNAME_HEREIt will guide you through setting up the user, giving them a password and the like. (Don't stress too much over filling out the user info like room number and work phone and whatnot.)
Next, run this command to add them to the wheel group, which is a special group that can be "promoted" to root using sudo:
usermod -aG sudo USERNAME_HEREThis works on Ubuntu 24.04, and likely other Debian-based operating systems. If this doesn't work, try replacing "sudo" with "wheel". If that doesn't work either, you can simply give your specific user sudo permissions by running the command EDITOR=nano visudo, then adding the following line:
USERNAME_HERE ALL=(ALL:ALL) ALLAt this point, try logging out and logging back in as your new user. Then, run the following command to promote yourself to sudo:
sudo su -It'll ask for your password - type it in. It should take you to a command prompt as root. If it says something along the lines of "This user is not in the sudoers file. This incident will be reported", then you'll need to log back in as root and check the sudoers file. If you need help with this, there are folks in the Discord!
If it did work, though, it's time to lock out remote root login.
Disabling Root Login
Before proceeding, make absolutely certain you can both log in as your new user and you can run sudo su - successfully. If you proceed, and you find you are unable to do either of these things, you will be locked out of SSH access to root altogether, and will need to use your webhost's console to re-enable root login.
Run the following command:
sudo nano /etc/ssh/sshd_configIn this file, look for a line that says "PermitRootLogin yes". You will want to change this line to instead say
PermitRootLogin noTo use Nano, you can move the text cursor with the arrow keys, and type as you normally would. When you're finished, press Ctrl+X. If you've made any changes, you'll be asked whether you want to save them or not - hit Y for Yes, N for No, then Enter to write the changes to the file you were writing (or change the name if you wish to write it to a new/different file.)
Save the file, and then restart SSH:
sudo systemctl restart sshFrom now on, you will only log into your server with the username and password you gave it. Trying to log in with the root credentials over SSH will not work. They will still work when logging in via your webhost's console, however, so keep your root password somewhere safe just in case you need it.
While not included here, you may also want to consider setting up login using a private key. This is more secure than a password. Steps to do this will be included at a later date, but it should be something you can find online or ask for help with.
Setting Up a Firewall
We're now going to set up the firewall so it allows you to log in to SSH and allows it to act as a webserver, but doesn't allow anyone else to connect to it otherwise.
These instructions should work on Ubuntu 24.04 and likely other Debian-based distros.
First, make sure ufw is installed and its service is running:
sudo apt install -y ufw
sudo apt enable --now ufw
Now, let's start adding rules for SSH, HTTP, and HTTPS:
sudo ufw allow ssh
sudo ufw allow http
sudo ufw allow https
After each command, it should say "Rules updated" and "Rules updated (v6)".
Then, enable the firewall:
sudo ufw enableIt will warn you it may disrupt existing ssh connections. As long as you added a rule to allow ssh connections, you shouldn't be disconnected.
In the event you are, for some reason, disconnected, don't panic - you can always connect to the server via your webhost's console.
Once enabled, you can see by running the following command that you are, indeed, allowing traffic on ports 22, 80, and 443:
sudo ufw status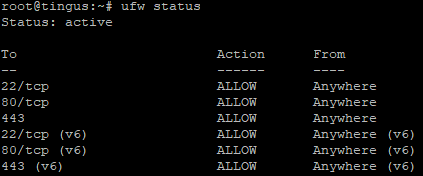
We don't cover setting up a firewall with the webhost, as this is unfortunately not something Hivelocity offers. If you chose a different webhost that does offer a firewall, the GoToSocial version of this page has a section on configuring a webhost firewall: Preparing Your VPS
Update
Now that we've got those bits out of the way, let's make sure your OS is up to date. Run the following command:
sudo apt update
sudo apt upgrade -y
It should automatically download and update all your OS packages. If there were any updates, you may want to restart afterwards, just to make sure they're in effect:
sudo shutdown -r nowRelatively easy!
These are only a few of the things you can do to increase the security of your system - this is only scratching the surface. You can write an entire book with all the ways you can further secure a system - such as installing and configuring something like fail2ban to monitor failed logins, auditing applications to monitor operating system changes, tweaking kernel settings - although, each security improvement also comes with its own caveats and associated difficulties. Consider what makes sense for your system and your risk level.
Next Steps
Once you've got all that out of the way, it's time for the moment we've all been waiting for - installing our node!
you can choose between either:
Have fun!