
Preparing Your VPS
Do NOT follow this portion of the guide at this time. There are issues with using Rocky Linux 9 for Akkoma that were not realized until later in the process. This will be re-written in a different operating system.
This page makes the following assumptions:
- You have a running VPS.
- You have a domain name that's pointed to your VPS.
If this is not the case, go through the first two pages, Planning a Node and Setting Up your Domain Name, then come back here.
Logging Into Your VPS
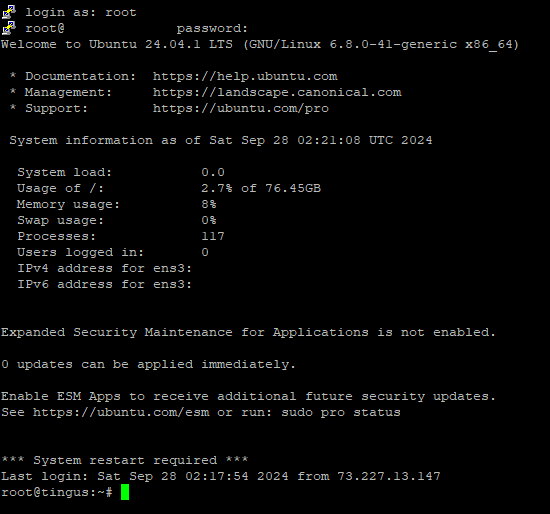
Your host should have given you a username and password - the user is likely root. If the user is not root, it's likely it has "sudo" permissions - meaning you can use it to become root once logged in (and you can disregard the "Creating a User Account" steps later in this guide.) You likely also have a console you can log in through on your host - and this is useful, especially if you goof something up and can't log in any other way - but it's more ideal to be able to log in through something called SSH. This basically gives you a command prompt directly into your server, and, among other things, it's likely much easier to copy-paste info to and from it.
Assuming you're running Windows, one program you can use for logging into SSH is called PuTTY. You'll want to download the MSI "Windows Installer" - likely 64-bit x86, or 32-bit x86 if your PC is really old. All the defaults should be fine. Once you start up PuTTY, you'll be presented with a window like this:
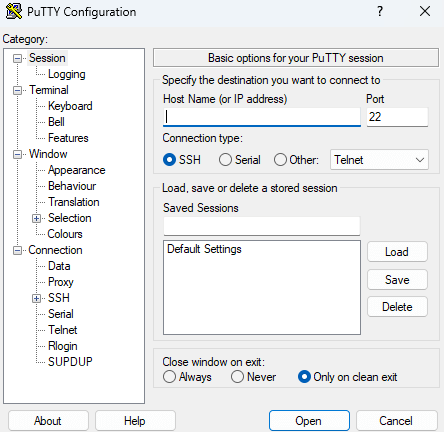
You'll put your VPS's IP address under "Host Name" and click Open, then press Accept. It'll then ask you for your username and password. Type in the details that your hosting provider gave you. Note that it won't show you typing any characters when entering your password - don't panic, that's by design. Once you do that, you should be in!
This image was re-used from the GTS tutorial because it looks exactly the same except for the hostname, and I wanted to conserve space ^^"
Before you continue, change the root password real quick by running this command:
passwdIt will ask you for a password. Type in whichever password you'd like, hit enter, and then type it in again. It should say "passwd: all authentication tokens updated successfully." If not, try again.
Let's also make sure nano is installed. This is a console text editor that's probably one of the friendlier options out there. (If you know you'd prefer vim/emacs, you can go ahead and use that instead!) Run this command:
yumapt install -y nanoIt should either install nano, or basically say "isit's already installed,the nothingnewest version, set to do.manually installed." Either way, you're good!
Securing Your VPS
At this point, you only have a root account with a password. While this technically works, this is not a good idea. The root account is one that has ultimate power over the server, and it's not one you typically want to be able to log directly into; instead, it's best to have a user account that you can then promote yourself to root through.
Creating a New User with Sudo Permissions
We're going to disable logging into the system as root over the internet. Instead, you're going to log in as a new user you're about to create, that can then be promoted to root using a command called "sudo". Run the following commands, replacing USERNAME_HERE with your desired username:
adduser USERNAME_HERE
passwd USERNAME_HEREAfterIt runningwill guide you through setting up the passwduser, command,giving it will once again ask you forthem a password, this time for your new user. Type in whichever password you'd like, hit enter, and thenthe typelike. it(Don't instress again.too Itmuch shouldover sayfilling "passwd:out allthe authenticationuser tokensinfo updatedlike successfully."room Ifnumber not,and trywork again.phone and whatnot.)
Next, run this command to add them to the wheel group, which is a special group that can be "promoted" to root using sudo:
usermod -aG wheelsudo USERNAME_HEREThis works on RockyUbuntu Linux 9,24.04, and may also work onlikely other Red Hat-Debian-based distros.operating systems. If this doesn't work, try replacing "wheel"sudo" with "sudo"wheel". If that doesn't work either, you can simply give your specific user sudo permissions by running the command EDITOR=nano visudo, then adding the following line:
USERNAME_HERE ALL=(ALL:ALL) ALLAt this point, try logging out and logging back in as your new user. Then, run the following command to promote yourself to sudo:
sudo su -It'll ask for your password - type it in. It should take you to a command prompt as root. If it says something along the lines of "This user is not in the sudoers file. This incident will be reported", then you'll need to log back in as root and check the sudoers file. If you need help with this, there are folks in the Discord!
If it did work, though, it's time to lock out remote root login.
Disabling Root Login
Before proceeding, make absolutely certain you can both log in as your new user and you can run sudo su - successfully. If you proceed, and you find you are unable to do either of these things, you will be locked out of SSH access to root altogether, and will need to use your webhost's console to re-enable root login.
Run the following command:
sudo nano /etc/ssh/sshd_configIn this file, look for a line that says "PermitRootLogin yes". You will want to change this line to instead say
PermitRootLogin noTo use Nano, you can move the text cursor with the arrow keys, and type as you normally would. When you're finished, press Ctrl+X. If you've made any changes, you'll be asked whether you want to save them or not - hit Y for Yes, N for No, then Enter to write the changes to the file you were writing (or change the name if you wish to write it to a new/different file.)
Save the file, and then restart SSH:
sudo systemctl restart sshdsshFrom now on, you will only log into your server with the username and password you gave it. Trying to log in with the root credentials over SSH will not work. They will still work when logging in via your webhost's console, however, so keep your root password somewhere safe just in case you need it.
While not included here, you may also want to consider setting up login using a private key. This is more secure than a password. Steps to do this will be included at a later date, but it should be something you can find online or ask for help with.
Setting Up a Firewall
We're now going to set up the firewall so it allows you to log in to SSH and allows it to act as a webserver, but doesn't allow anyone else to connect to it otherwise.
These instructions should work on RockyUbuntu Linux 924.04 and anylikely other recent RHEL-Debian-based Linux distro. If you're using a different distro, instructions to set up the firewall may be different.distros.
First, make sure firewalldufw is installed and its service is running:
sudo yumapt install -y firewalldufw
sudo systemctlapt enable --now firewalldufwThen,Now, checklet's tostart see what your default zone is, then list all theadding rules infor yourSSH, current zone:
sudo firewall-cmd --get-default-zone# Replace public in all following commands with whatever zone your default is
sudo firewall-cmd --zone=public --list-allIf ssh isn't in services, add it:
sudo firewall-cmd --zone=public --add-service=sshThen, add HTTPHTTP, and HTTPS:
sudo firewall-cmdufw --zone=publicallow --add-service=ssh
sudo ufw allow http
sudo firewall-cmdufw --zone=publicallow --add-service=httpsFinally,After runeach thiscommand, commandit toshould makesay this"Rules configurationupdated" permanent:
and "Rules updated (v6)".
Then, enable the firewall:
sudo firewall-cmdufw --runtime-to-permanentenableHopefully,It runningwill these commands did not result inwarn you beingit disconnectedmay fromdisrupt theexisting server.ssh connections. As long as you added a rule to allow ssh connections, you shouldn't be disconnected.
In the event thisyou happens,are, however,for some reason, disconnected, don't panic - useyou can always connect to the server via your webhost's consoleconsole.
Once logenabled, inyou can see by running the following command that you are, indeed, allowing traffic on ports 22, 80, and add443:
sudo toufw thestatus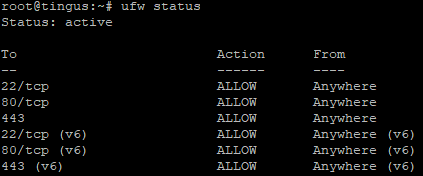
We don't cover setting up a firewall with the webhost, as this is unfortunately not something Hivelocity offers. If you chose a different webhost that does offer a firewall, the GoToSocial version of this page has a section on configuring a webhost firewall: Preparing Your VPS
Update
Now that we've got those bits out of the way, let's make sure your OS is up to date. Run the following command:
sudo yumapt update
sudo apt upgrade -y
It should automatically download and update all your OS packages. If there were any updates, you may want to restart afterwards, just to make sure they're in effect:
sudo shutdown -r nowRelatively easy!
These are only a few of the things you can do to increase the security of your system - this is only scratching the surface. You can write an entire book with all the ways you can further secure a system - such as installing and configuring something like fail2ban to monitor failed logins, auditing applications to monitor operating system changes, tweaking kernel settings - although, each security improvement also comes with its own caveats and associated difficulties. Consider what makes sense for your system and your risk level.
Once you've got all that out of the way, it's time for the moment we've all been waiting for - installing Akkoma!